Leaderboard


Popular Content
Showing content with the highest reputation since 05/22/2021 in Posts
-
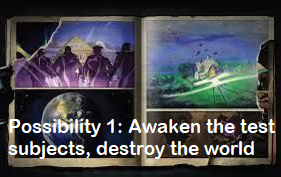
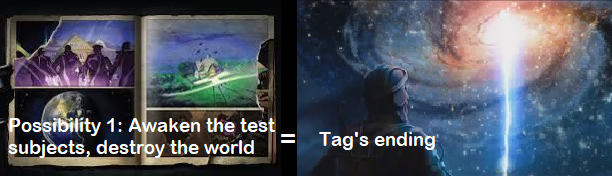
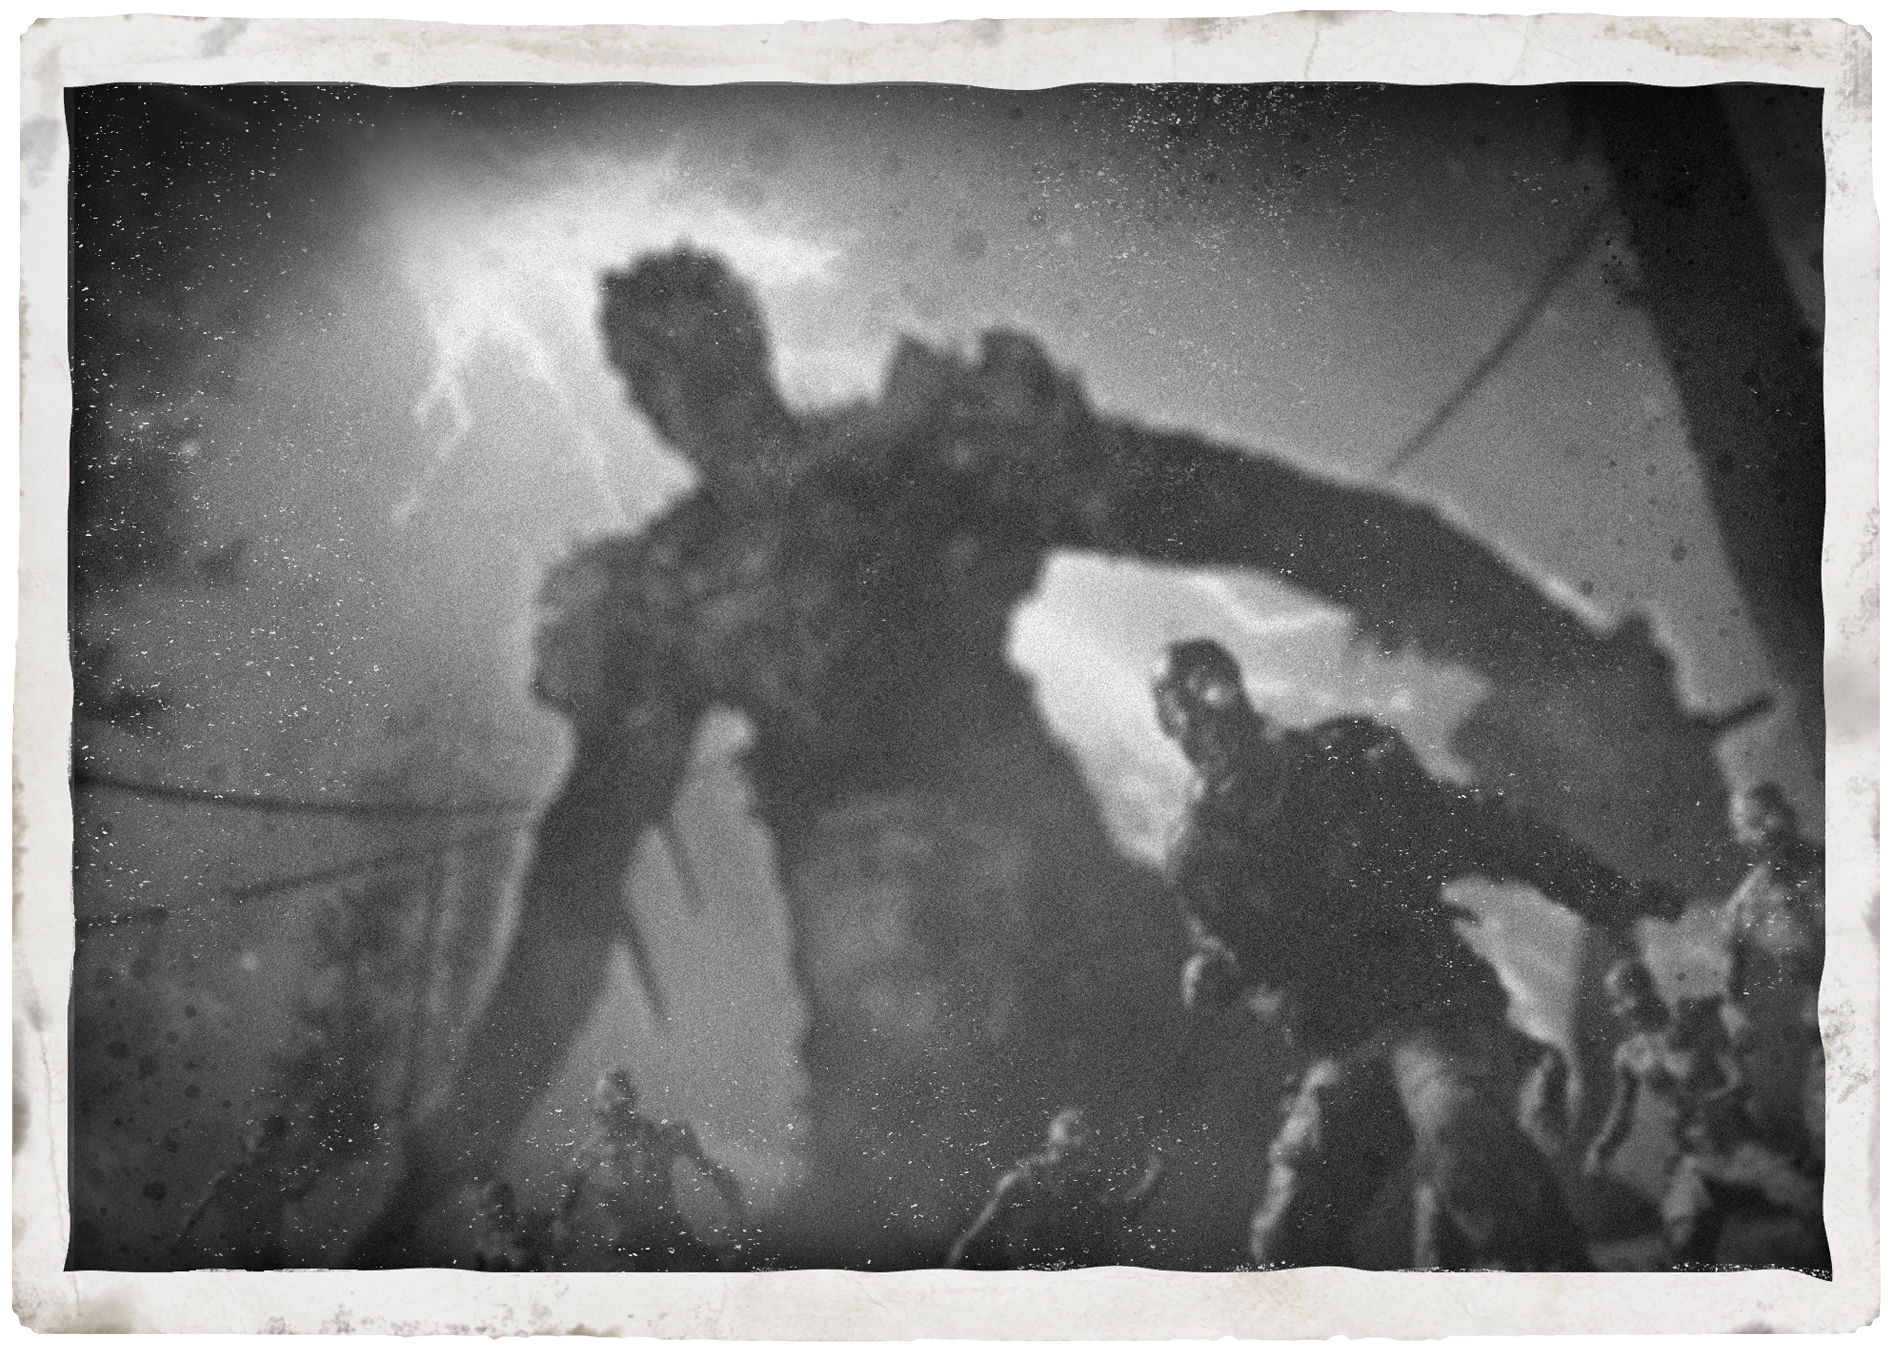
I'm enthousiast to say that I have found a theory to explain the big paradox that bridges the Giant and Tag der Toten, and simultaneously the Cycle and the Broken Cycle. Both outcomes of the Multiverse requires the other one to exist, but how can this paradox be explained? Big thanks to @Forest Fire with his interesting discussions and thoughts on this subject, which sparked the idea of this thread. Also, you need a bunch of Cristopher Nolan brains for this one, so good luck. A Paradoxal Prologue A discovery made by no one else than our @clueless himself was a paradox that emerges in the Giant, a paradox that is proof that the Cycle has been broken before. To understand this we have to look at Mob of the Dead, the map that is essential to breaking Monty's Cycle. As you may know had Primis to travel through Alcatraz between Zetsubou no Shima and Gorod Krovi, however at some point in the Cycle a trap was set up. Essentially, the souls of the mobsters were used to create a pocket dimension (Mob of the dead), eternally trapping Primis, disabling them to proceed in Monty's Cycle (Blood of the Dead). During the climax of Mob of the Dead, the souls of the prisoners are transported to the Golden Gate Bridge. But this time, the plane doesn't crash because Weasel meant to bring them here. So what happens to the plane? Well, if the Cycle Continues, the purgatory Hell dimension does a "soft reset" that returns everything back to its former spot, and the only ones with memories are the Warden and Weasel. Icarus never makes it far enough to reach the storms Eventually though, the Weasel does win, stopping the Alcatraz Cycle and causing Monty's Cycle to break as well via Blood of the Dead's ending, Alpha Omega and Tag der Toten. So Icarus, flying through the sky, eventually flies through the storms overhead. In Zetsubou no Shima we get a glimpse of what such storms can do; temporal displacement. Point of the story: Only in a Broken Cycle can Icarus leave Alcatraz. And, ladies and gentlemen, what do we encounter on the roof of the Der Riese Waffenfabrik during the Giant? Icarus, the indication and proof that the Cycle has been broken before. This is the Giant's Paradoxal Prologue to our story… Dempsey: "Hey other me, if you're hearing this, then it means something's gone FUBAR. We're going to Plan B. Stick to that kraut bastard like glue. We need to find out what the hell he has been doing, what he's going to do. We may be able to get a fix on your location if you can trigger one of the paradox visualizations. Good luck, we're all counting on you. Oh, wait, what ever you do, don't get too close to the radioactive beacon. Makes your hair fall out." The Nexus Point I've devoted an entire thread to this which I can recommend to read, but I will summarize it here. The main point is that the events in the intro cutscene of The Giant is a so-called 'nexus point', an event where various timelines converge. And there are two possible outcomes, hear me out. Primis Nikolai, Dempsey and Takeo arrive at der Riese and persuade Ultimis Richtofen to join them and awaken the test subjects. What's more, they tell him to not open the MTD because that would unleash a great evil. Here's the split: either Richtofen activated the teleporter, or he doesn't. In case he doesn't, they will awake the test subjects and some radioactive event will occur, leading to the 'Fallout House' radios: Maxis is talking about a battle won, a nuclear wasteland, the children disappearing and himself suffering from a radioactive disease. Possibility 2 is that Ultimis Richtofen does activate the MTD: Primis Richtofen steps out and Monty's Cycle will happen. He is send by House Maxis, who is following Monty's plan to fix the world ever since the "knock on the door". Ever since, the past is changed and Maxis perceives that the children return and his radioactive disease is reversed. As the original outcome of the universe was changed, his old experiences first became vague memories, and then vanished completely. But this is not restricted to Maxis: Also Primis Nikolai, Dempsey and Takeo who initially firmly wanted to keep Ultimis Richtofen alive and awaken the test subjects, now fall into confusion and follow Primis Richtofen who obeys Maxis' mantra: "the test subjects must never be awoken". Completely reversed to their initial plan. Maxis: "Reality itself is shifting. I find myself reflecting on memories I am not longer sure are my own. Beyond the window, I saw a wasteland stretching far as the eye could see. I saw scourge visited upon the Earth. I saw the children withered before my eyes. That was before... before he came. Samantha has been returned to me once more, as have you Edward... as have you." Of course, Possibility 2 is what we directly see in Black Ops 3. But Possibility 1, the outcome that got overwritten by Possibility 2, is what happened prior. It is the outcome that eventually led to a "battle won" but with a very pyrrhic victory: A world destroyed by radioactivity. The Beacon Remember the Dempsey radio I quoted earlier? These personal messages to Primis Nikolai, Dempsey and Takeo are recorded before Possibility 2 overwrote Possibility 1, so outside Monty's Cycle. Dempsey states that they may be able to get a fix on other Dempsey's location if he and his pals can trigger a paradox visualization, coming back on that later. If you thought things were complicated, brace yourself for the next part. Now in Tag der Toten, you can hear Richtofen saying the following: "I remember something Samantha told me a long time ago. She told me her "dad had a plan"." This plan of Maxis, obviously referred to by Sam's quote in the Origins outro cutscene which took place in the House before Possibility 2 overwrote Possibility 1 (as the Cycle didn't happen yet), may include whatever led to "winning the battle and destroying the world". This old plan of Maxis was before Monty instructed Maxis the events of Black Ops III. Anyway, immediately after Richtofen saying this in Tag, Nikolai exclaims "Look, the Lighthouse is lit!". This sounds very much like Maxis saying: "Look, the Beacon is lit" after completing the Giant's 'Paradoxal Prologue' easter egg. In Blood of the Dead it is made clear that a lighthouse is a way to communicate across the Aether. So are our actions in the Giant essential for what happens in Tag der Toten, and vice versa? Is this why Dempsey mentions that he needs to get a fix on the location of his other self via a beacon that is radioactive? Talking about radioactivity, is the beacon the reason of the radioactive world that was a consequence of Maxis' plan? The description of Tag's Easter Egg is to "Resolve the Paradox". It could function, in a certain way, as a means to complete the paradox, the very paradox we were introduced at in the Giant. Tag der Toten is the final piece of puzzle for the odd radioactive timeline that was caused by Possibility 1 even before the Black Ops III Cycle started. Perhaps the fire and lava appearing in Tag during this quest as a consequence of '115 evolving' may be caused by the nuclear fallout of Maxis' plan. So before the Giant happened, Tag der Toten was already going on. Or no, what is better to say, Tag der Toten already happened: Time is irrelevant in the Multiverse. The crashed Icarus at the Giant is proof that plane has left the Alcatraz Cycle and that the Monty Cycle was broken before. But if you think we are finished, there is something else left. The End There is one thing you may be wondering: If Tag already happened, how could there still be a Multiverse with Element 115 at all? Consider this: We activated the Beacon while playing the Giant, which already takes place in Possibility 2. So to break the Cycle, the Cycle must already have occured. And I think the location that Dempsey wants us to trigger is that of the Frozen Forest. Remember this sequence: "I am the last of us, but I will be joining you soon my friends. -cough, cough- death is near. I hope what we have done doesn't come back to bite this universe in the ass. Thank god we will all be gone, because if Monty ever found this place, we would be in a world of shit. Maybe now, with us all gone, the children will truly be safe. -D " This sounds very much like the ending of Tag der Toten. Nikolai, Dempsey, Takeo and Richtofen die in the Frozen Forest so the children will be safe in a new world, without Element 115 and Aether. This may be what happened at the end of Possibility 1: Maxis mentions that the world is destroyed (the 'old' Aether Multiverse is presumably absorbed in the radioactive Dark Aether) and the children are gone (they left to the new world, Maxis explicitly says they are gone and not neccesarily dead). The Element 115 that is 'evolving' at the end of Tag is already the process of it vanishing from existence, and the world is annihilated in a radioactive fire. Now the sentence "awaken the test subjects" even makes sense: It regards Victis in their cryogenic slumber cells in Alcatraz. Because Primis travelled to the Frozen Forest, Victis is woken up and Tag can actually happen! So could the outcome of Possibility 1 not only be Tag der Toten, but also the dissolution of the Aether Multiverse in general? And then, Monty knocked on the door of the destroyed House, eventually triggering Black Ops III to happen which backwards affected everything so the Aether Multiverse was contineously re-established anyway again? If you came this far, cheers on that. Hope to see you in the comments!
 4 points
 -
My Asylum Threads, the medals, donations, hell my UOTM Cyan Robe.. Its been almost 5 years. No explanation and truly I did not expect to feel this gut wrench as I logged back in. I am excited don't mistake that. I hope someone will make it right and redeem what name I had. I missed you all very much and I know I never was able to express that. So many great memories and I hope more to come. I know other people find themselves here just as I did to rest from whatever they maybe going through in their lives. To get away for a bit. Its a hell of tough world out here.. Thank you for allowing me a place by the fire again to rest a bit. UOTM "User of The Month" would nominated by someone, then voted those nominated would be voted on by the community. Things like this cultivated a friendly competition. It gave us a chance to be apart of something bigger. A Thread or Theory could only be add to The Asylum by an Admin. Usually if a Theory is added its only because it either became a fact or it was just that damn interesting. I am unaware of how its now... UOTM wasn't always the most active, but they did put some thought into a post. You could tell they sat down, researched, then created and theorized. At times I believed I learned more from Zombies than I did my history class... We all would be tested by the facts vs unknown respectfully. On rare occasion you would witness a Theory led to another and it was almost as if our community manifested certain things. We began to see our debates bring new life in game. To be among other great minds debating lore, deciphering messages, creating guides, creating new ways to play this game with our own events....etc. To be among other great minds to name a few: @MixMasterNut, @GRILL, @anonymous, @Electric Jesus, @Mysteryo, @Lenne, @Hells Warrrior, @Tac, @Spider @InfestLithium - before becoming an admin I remember having to take the Reigns of The Zombie Olympics, while you were on Vacation. The implementation of Liquid Divinium as a website currency was a clutch move. I still have The Call of Duty Zombies TCG cards and the instructions on how to play my man! I don't think anyone will every be able to get these cards. They are one of a Kind. @PINNAZ worked so hard and gave us one of the greatest Audio Archives. Sorry we could never get a decent match! @RichKiller This guy has been credited for solving a lot of the Ciphers. @MrRoflWaffles as a staff member.. who now is a go to for no nonsense guides and his incredible love for Call of Duty Zombies. Youtube: MrRoflWaffles There’s something poetic about the idea of lost recognition. Debating lore, deciphering messages, creating guides, creating new ways to play this game with our own events.. All the posts I created confirmed that maybe I truly did think I did something special here. Coming back to a place where you left a mark but feeling like a ghost.. I was apart of something bigger, only time will tell. A new dawn awaits and I look forward to a bright future.
3 points
-
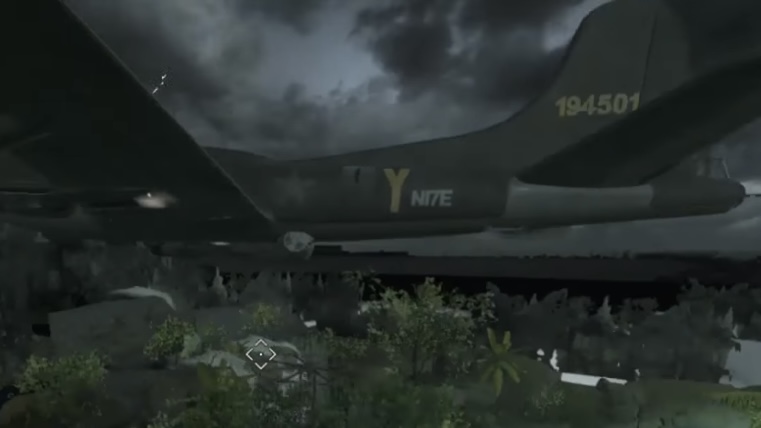
The serial number, printed on the tail of the plane, reads “194501”. There are a couple things we can determine from this, one is that the plane was manufactured in 1941, as the entire serial number would read 41-94501”. And two, is that they would identify themselves over the radio as “Yankee-501”, we can determine this because of the large “Y” painted on the side of the plane, and the last three numbers of the serial number. My theory is that Treyarch intended this to be an easter egg where the radio callsign (Yankee-501), is read as “Yankee SOL”, using L33T speak, or “Yankee sh*t out of luck”. Referencing the Americans, or Yankees, on board, being shit out of luck, they crash and subsequently all die on this night. Speaking of night, I assume that “NI7E” is simply supposed to be read as “night”, in L33T speak.
2 points
-
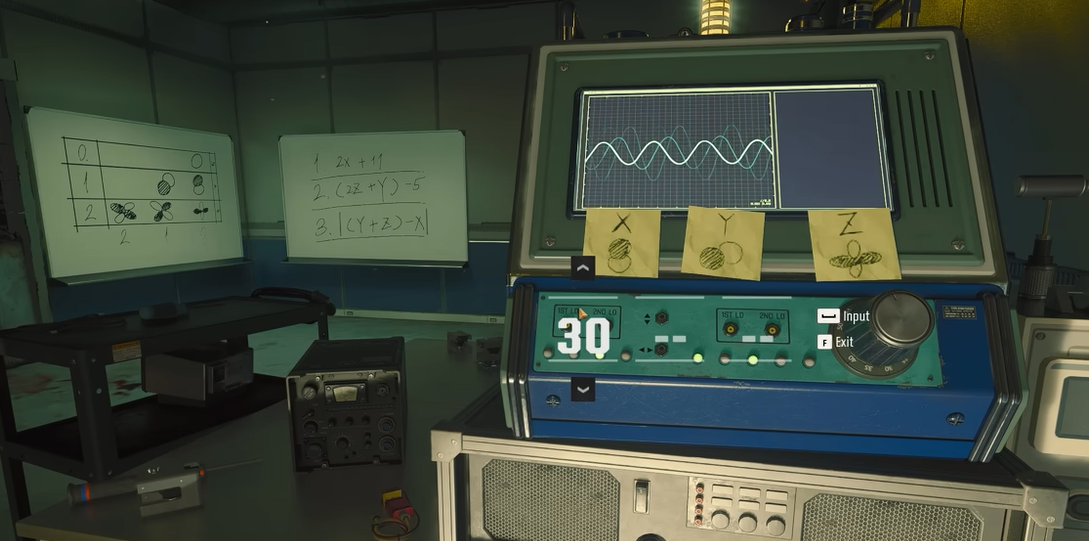
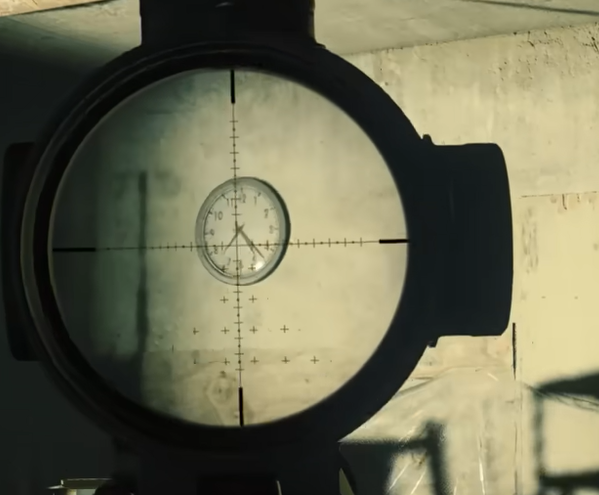
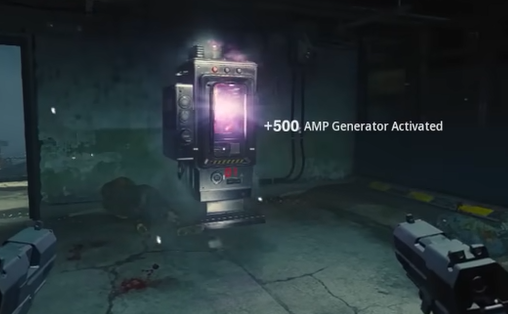
Disclaimer: All screenshots / images are re-purposed from videos form public channels. Source links will be provided at the end of this text guide for credit and reference. ----------------------------------------- Easter Egg Guide Recommendations, tips and tricks for completing this Easter Egg as easy as possible are available at the end of this post. STEP 1: Turn on AMP Generators (power) across 3 locations/modules: Location 1: Guard Station, near exit heading outside Location 2: Juggernog room, near tentacle trap switch Location 3: Bio-Lab, center 2nd floor of entire lab Note: These locations will always be marked by a yellow start icon in the match. Step 2: Activate the Pack-a-Punch machine underwater in the Bio Lab. Step 3: Obtain the Beamsmasher Wonder Weapon. Note: There are two ways to get the Beamsmasher: via the Mystery Box, or by completing the side quest. If you intend on doing the sidequest, expand the spoiler below. Step 4: Obtain the hard drive from a Tentacle Trap by shooting the trap tentacles with the Beamsmasher and give to Peck/Strauss. There are 4 possible locations where this hard drive can drop (see list below); however, you can tell which is the right one by finding the trap that has a broken upper grate and a Project Janus keycard on the floor. Make sure you are using the primary beam of the Beamsmasher on the tentacles, and not the alternate beam. Juggernog room Spawn / Guard Station Bio Lab (entering Speed Cola tunnel) Bio Lab (entering PhD Flopper tunnel) Step 5: Find and enter the 3-digit passcode for the Bio Lab chamber. After completing Step 4, you can actually begin doing this step and location the digits needed to unlock the Bio Lab chamber. The locations for the digits can be found: First digit is in the Quick Revive room. Look at the clock in the zombie spawn barricade and note what hour the short hand falls on. Second digit is in the Mess Hall (cafeteria). Look at the bulletin and note what number is on the playing card tucked on the board. Third digit is in Engineering (workbench, outside of Juggernog building). Look at the "Days Since Last Injury" sign and note the number. Once you have all the digits, go back to the Bio Lab chamber (center of the entire lab) and enter the digits on the keypad. Step 6: Turn the Bio Lab chamber dials to release Nathan. If you are doing this Quest with multiple people, a majority of the squad needs to turn these dials simultaneously. For instance, a 4-person squad only need 3 people to turn the dials. Note: After Step 6, you will enter the mid-Quest boss fight against Nathan. Be warned that this will lock you in the Bio Lab with infinitely spawning zombies until Nathan is defeated. Step 7: Obtain the key card in the bottom of the Bio Lab water. Bonus tip: while you are down here, go to the left where the Pack-a-Punch lift originally was underwater and find a lightly-shaded rock. If you throw/shoot an explosive at it, you will be able to retrieve an oxygen tank. This will be very helpful for the final boss fight. Step 8: Travel to the bottom of the Ship, climb up the ladder, and obtain the nodes. Note; Similar to the Nathan boss fight, you will be locked in the Ship room but only have to deal with 3 waves of zombies spawning in. After completing these waves, the hatch where you entered the room from will re-open and you can exit. Note that while you have the node on you, you will be unable to sprint. Step 9: Take and reconnect the node to 2 of 3 locations that may have a missing pipe connection. Repeat the same for the next node. There are 3 possible locations these incomplete connections can be: Crab Island, opposite of the workbench near the shore Under the Sea Tower (see image below) Speed Cola Sea Caves, right side path Note: It will take a couple of seconds to connect each node, which means you'll be susceptible to zombies while completing this step. Step 10: Return to the Guard Station and obtain the hacking device from Peck/Strauss. Note: Some players have reported a slight delay with getting the hacker device. Make sure the dialog with S.A.M. and the crew finished, then long-interact with Peck at the Guard Station window until the dialogue reactivates again. Step 11: Travel to 3 buoys outside the island water and hack each one within the time limit. Each buoy will flash a yellow light and have satellites on top of them, so you'll know which ones to hack. You will need to jump into the water and interact-hold with the buoy to hack it. Once you hack the first buoy, the timer will begin to hack the others. During this time while you are hacking, you'll be swarmed by Parasites. Step 12: Upon the final buoy hack, immediately go back to the Bio Lab and defuse 3 bombs within the time limit. When you enter the Bio Lab for this step, you will be locked in, similar to the Nathan boss fight. 3 bombs will slow appear in a few windows that you'll need to de-activate. Their locations are always the same: Ground floor (floor where Melee Macchiato is at), left window before left stairway begins Ground floor (floor where Melee Macchiato is at), right window before right stairway begins 2nd floor directly under the 3rd floor De-activating the bombs take a LONG time, and you will absolutely be susceptible to zombies. If you are doing this with a 2 or more squad, the bomb progress will SLOW RESET if you do not complete it all the way (bomb progress is halted in Solo). I highly recommend throwing down Decoys/Monkey Bombs and using Aether Shroud to get through them all. Note: Failure to complete this step will immediately end the game. It's important to be well-prepared before attempting Steps 11-12. Step 13: Enter the Bio Lab door near Melee Machiatto where the boats spawn for the final boss fight. Note: Once you enter the boss fight, the next round will "start" but you will be locked in the docks area. It is widely and strongly recommended to have a Chopper Gunner scorestreak, Tier 3 armor, full equipment, mid-level upgraded guns and at least 10k essence before starting this fight. THIS BOSS IS LONG AND DIFFICULT. But still do-able. Round number does not change the boss health or damage. There are 3 phases to this boss, with an intermittent "break" between each phase. Infinite zombies will be spawning all throughout this fight. Phase 1 is basic - shoot the red tumors on the boss's arms, as these are the critical spots for damage. Boss will occasionally slam and sweep the field, so hide behind the boxes in the corners to avoid this attack. Interim Phase 1 begins after you get Phase 1 ends (33% health gone). The boss will disappear and multiple zombies will appear including a couple Manglers, which you will want to defeat. You'll get a max ammo after surviving for a while. Phase 2 is the same as Phase 1, except the critical spot is now the mouth. Same attacks as before. Eventually, the critical point will move to the boss's tentacles (where you'll see yellow tumors). Interim Phase 2 begins after Phase 2 ends (66% health gone). Same as previous interim phase, but now Amagalms are in the mix. You'll get a Max Ammo from this as well. Phase 3 is the most difficult. Besides the previous attacks, the Boss will now slowly charge a blue energy ball above its head. Right before it unleashes it (which is a ONE-HIT-KILL), jump into the outside water and let the attack finish, then resurface and climb back up onto the docks. Critical spot will be its head while it's blue. When it turns red, it will get red tumors in the same spots as Phase 1. Rinse a repeat until the boss is defeated. Alternatively, shortly after this phase begins, go behind one of the corner boxes and activate the Chopper Gunner scorestreak. Shoot the head and you should be able to almost if not completely defeat the boss with this alone. Completing the Quest will allow you to exit the match with Exfil-like rewards or continue playing. If you choose to continue, round-based zombies will return and you will be presented with several rewards such as Wonder Weapons, all perks obtained, rarity upgrade tools, and scorestreaks. -------------------------------------------------------- Image/video sources: https://www.youtube.com/watch?v=VvsvyH3h-xk https://www.youtube.com/watch?v=W2AKsf1IH8M -------------------------------------------------------- Recommendations The Terminus Easter Egg has a sharp learning curve to it for most players. Here are some weapon and equipment setups that will help you further succeed in completing this Easter Egg. WEAPON LOADOUT Primary: GS45 (akimbo) or ASG-89 The GS45 akimbos are basically Mustang & Sally. Not only will they keep you alive for most of the quest, but they are highlight effective against the final boss, allowing you to hit ANY part of its body and do damage. Not to mention, they will melt the Nathan boss fight as well. For the final boss fight: Rarity 3 and Pack-a-Punch 2 will do just fine. The ASG is a heavy-damage gun that shreds Manglers and does good damage on the crit spots of the final boss. Paired with Dead Wire, it can also take down Amagalms easier and still do big damage against manglers. For the final boss fight: Rarity 3 and Pack-a-Punch 2 will do just fine. EQUIPMENT LOADOUT Tactical: Decoy/Smoke Lethal: any (preference: Combat Axe) Field Upgrade: Aether Shroud You absolutely will need some kind of decoy tactical to do a couple of steps that involve turning your back on zombies, especially the bomb step. While you can also craft these and Monkey Bombs at the workbench, I highly recommend starting out with some to stack a couple ahead of time before wasting your salvage. I do recommend the Combat Axe as a lethal simply because it's retrievable and One-Hit-Kills normal zombies. You can stack up to 5 (from my experience), and works very well when trying to conserve ammo during the final boss fight. Aether Shroud will absolutely help in some of those time-sensitivity steps and help you deliver some nearly-uninterrupted damage on the final boss. Overall a very solid field upgrade to stay alive with. GOBBLEGUM LOADOUT Cache Back (spawn Max Ammo) Shields Up (replenish all shields) Idle Eyes (ignore zombies for 30 seconds) Hidden Power (upgrade current gun to Legendary rarity) Wonderbar! (next Mystery Box roll will yield a Wonder Weapon) Most people would run with Cache Back and Idle Eyes, simply because ammo and time is so precious in BO6. If you're looking to min/max the Quest, however, nothing beats saving salvage and essence like Hidden Power and Wonderbar to skip the tediously-long Beamsmasher side quest or get your primary weapon ready for the boss fight early on. It's up to you what you value most when doing the Quest. PERK SETUP Quick Revive (+Equivalent Exchange augment a major plus) (preferably with squad) PhD Flopper Stamin-Up Quick Revive is always a must. And with Equivalent Exchange during a squad Easter Egg hunt, you can get back into the fight quicker. PhD Flopper is also a must if you're going to use the GS45's Pack-a-Punched versions, Sally & Forth. Stamin-Up will help you escape tight moments easier, which for a map like Terminus, is going to be very handy for you. In reality, however, you don't need to prioritize much on perks (aside Quick Revive), as you can get free perks by doing some of the side quests in Terminus. The real need for them arrives when it's time for the final boss fight. OTHER TIPS If you are not high enough level to craft a Chopper Gunner for the final boss fight, then do your best to get one from a drop by a Mangler or Amagalm and hold onto it tightly. You can do without it for the final fight but it would be insanely easier with one. You can avoid doing an armor upgrade up until you're ready to start the boss fight. It's a good way to save another 6k essence by skipping Tier 2 armor early on. Do the basketball side Easter Egg for several thousand free essence. If you have the Who's Keeping Score Gobblegum, you can double those earnings, making Pack-a-Punch earlier on totally possible. S.A.M. trials are very 50/50 while doing the Quest, so I'd personally recommend avoiding them unless you feel very confident you can manage your resources wisely. Open/dig as many chests and bone piles as you can every round. That's easy essence, salvage, and sometimes a Ray Gun or Perk-a-Cola!
1 point
-
Really hoping good things for BO6. Terminus looks like the traditional Zombies we've been wanting with a more modern system/feel. It's refreshing. Liberty Falls...I'm worried will be another MWZ. Based on the recent media we got, it looks like 3arc listened about the poor UI and design elements, but kinda thinking it'll still pale in comparison to Terminus. Probably meant that way to appease large-environment players (those who enjoyed Outbreak in CW) and old-school players with Terminus. As far as Gobblegums go, I really hope they get more artistic liberty with them like the Whimsical GGs we saw in BO3. Might not mean much but it was playful and brought fresh blood to super long matches. At least IMO.1 point
-
There's been a pastebin leak floating around that showed the Black Ops 4 intentional lifecycle. HOWEVER, it's best to take a grain of salt of this anonymous pastebin leak. So... here's the Pastebin Leak. Defiantly taking reads from this... As what I'm getting from this, it actually appears that Tranzit would've made it's full grand return, if we got that Year 2.1 point
-
Very skeptical because what they're saying is from prior leaks from BO4 before the cold war takeover. Also while at it, you wouldn't believe it, but there's a Tranzit + Zombies concept art dump that just dropped there.1 point
-
UPDATE: 6/14 The same leaker who posted not only about some clarification's, but gave a insight of why we never got the Year 2. Again, take a grain of salt with this one. The Pastebin leak of the clarifications1 point
-
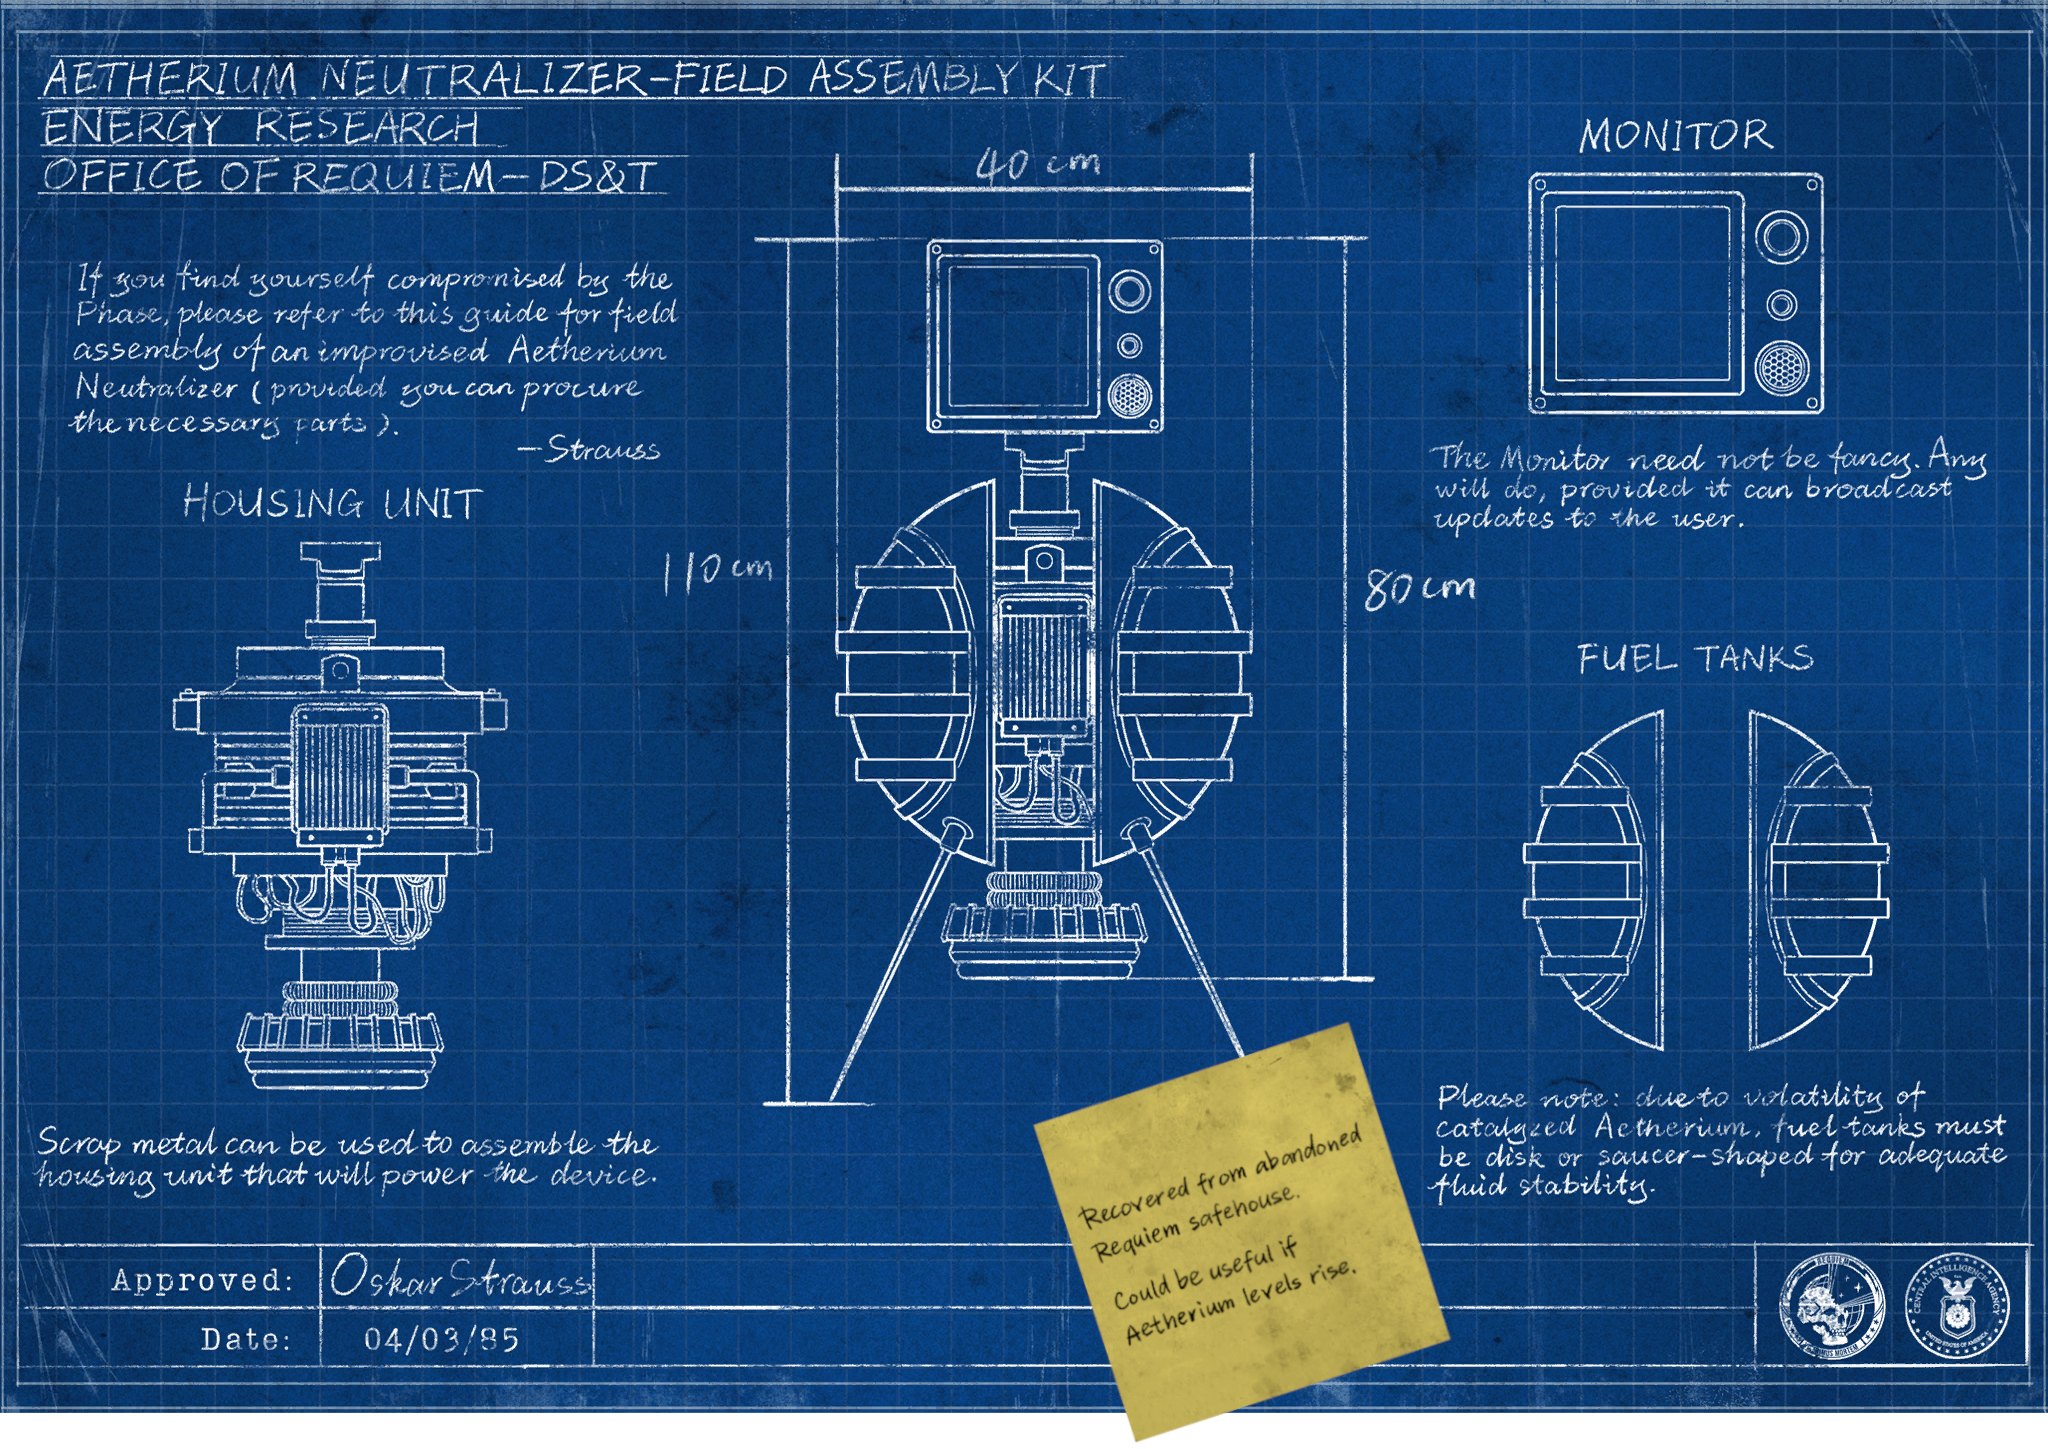
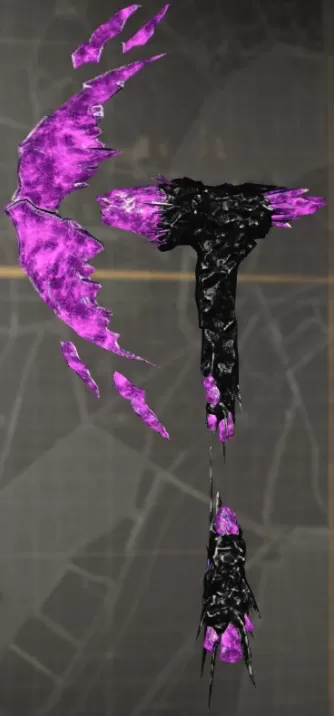
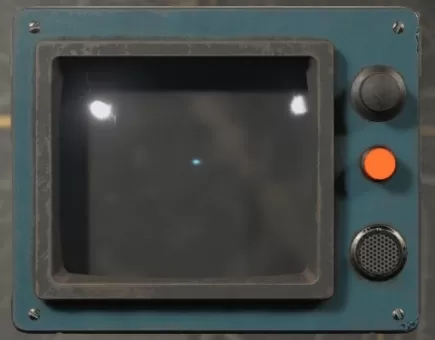
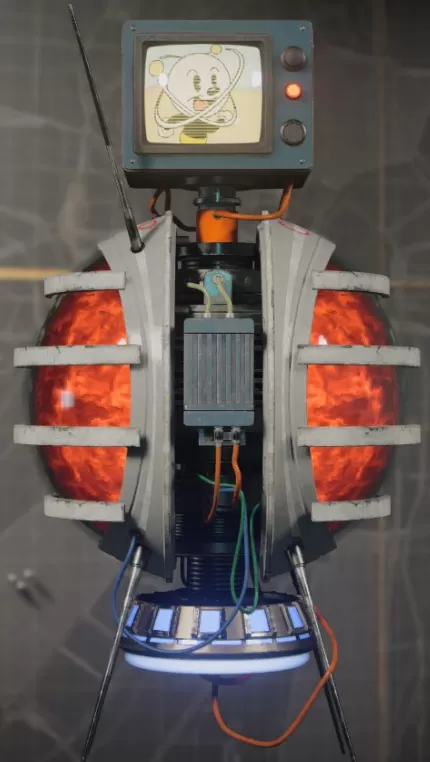
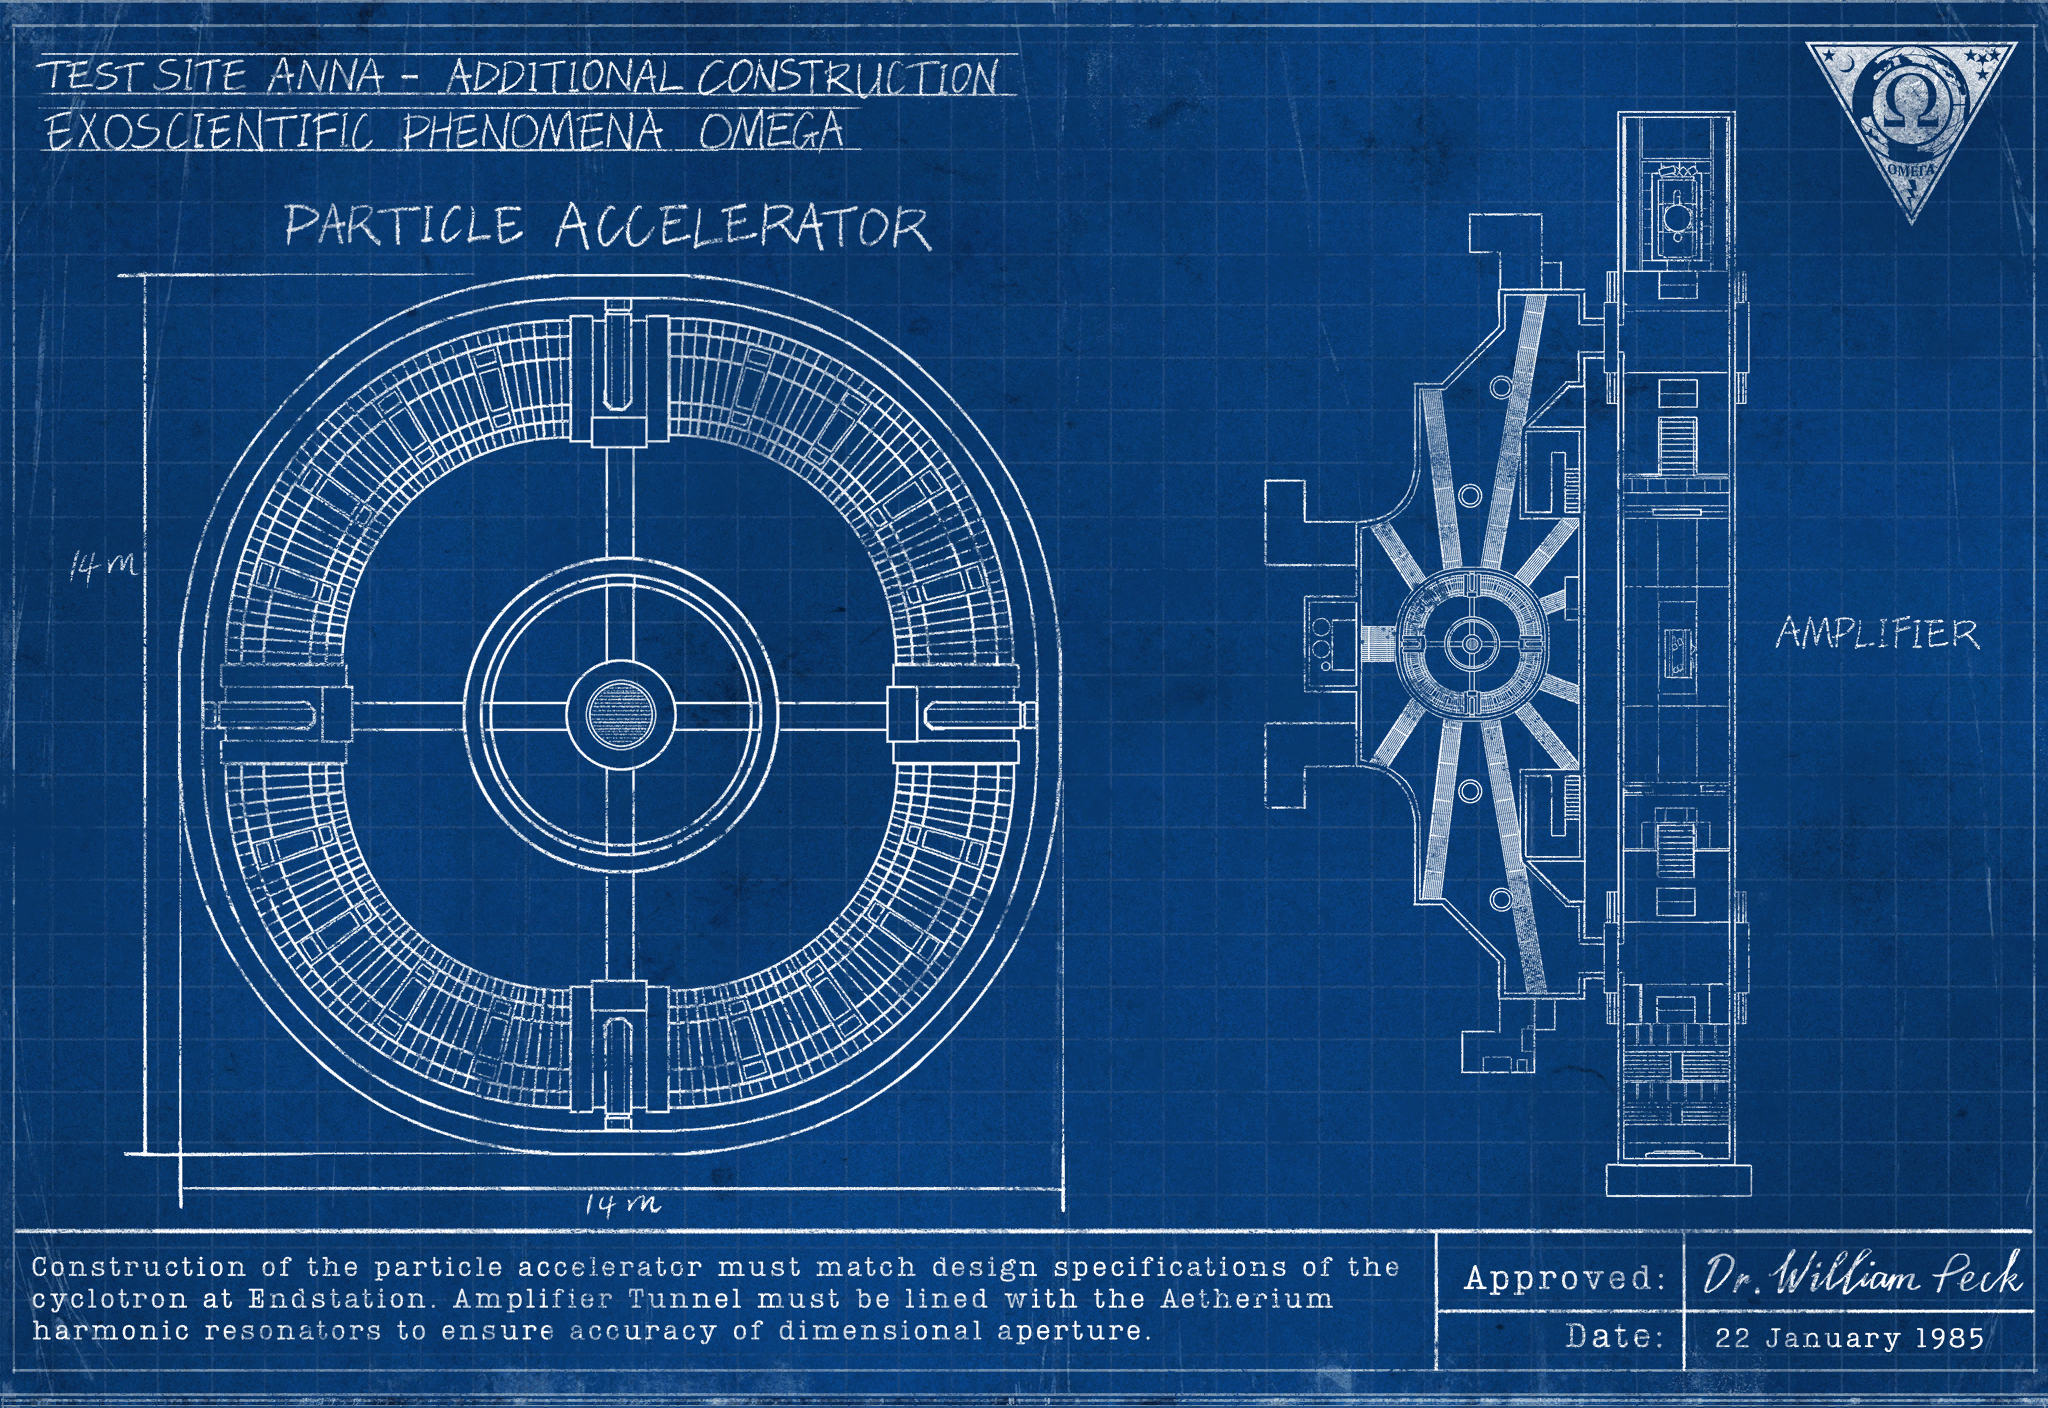
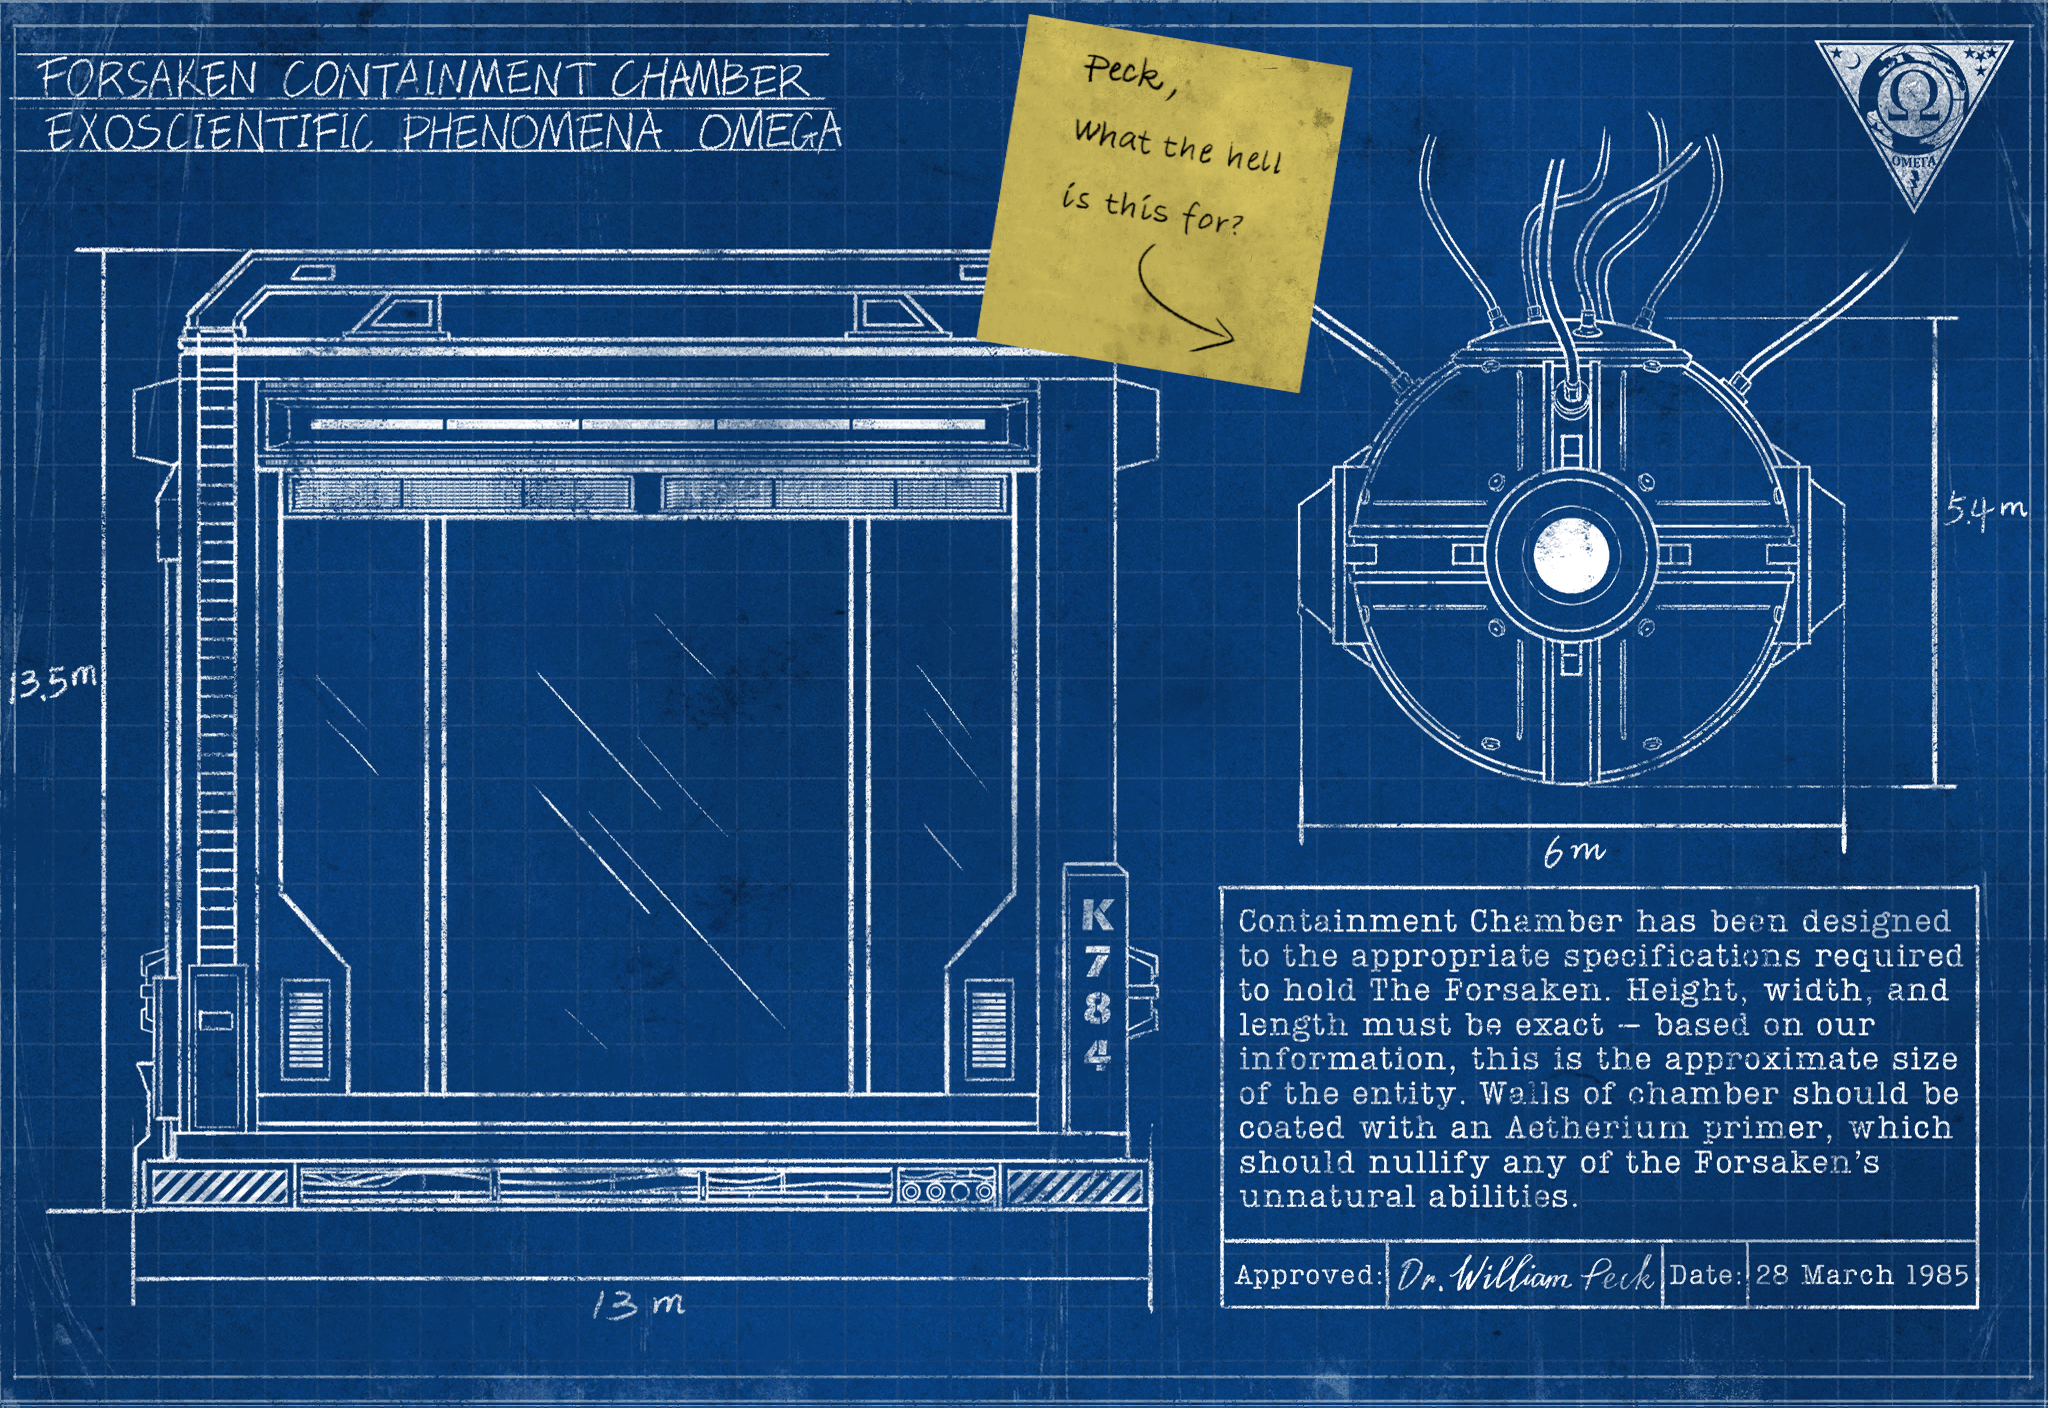
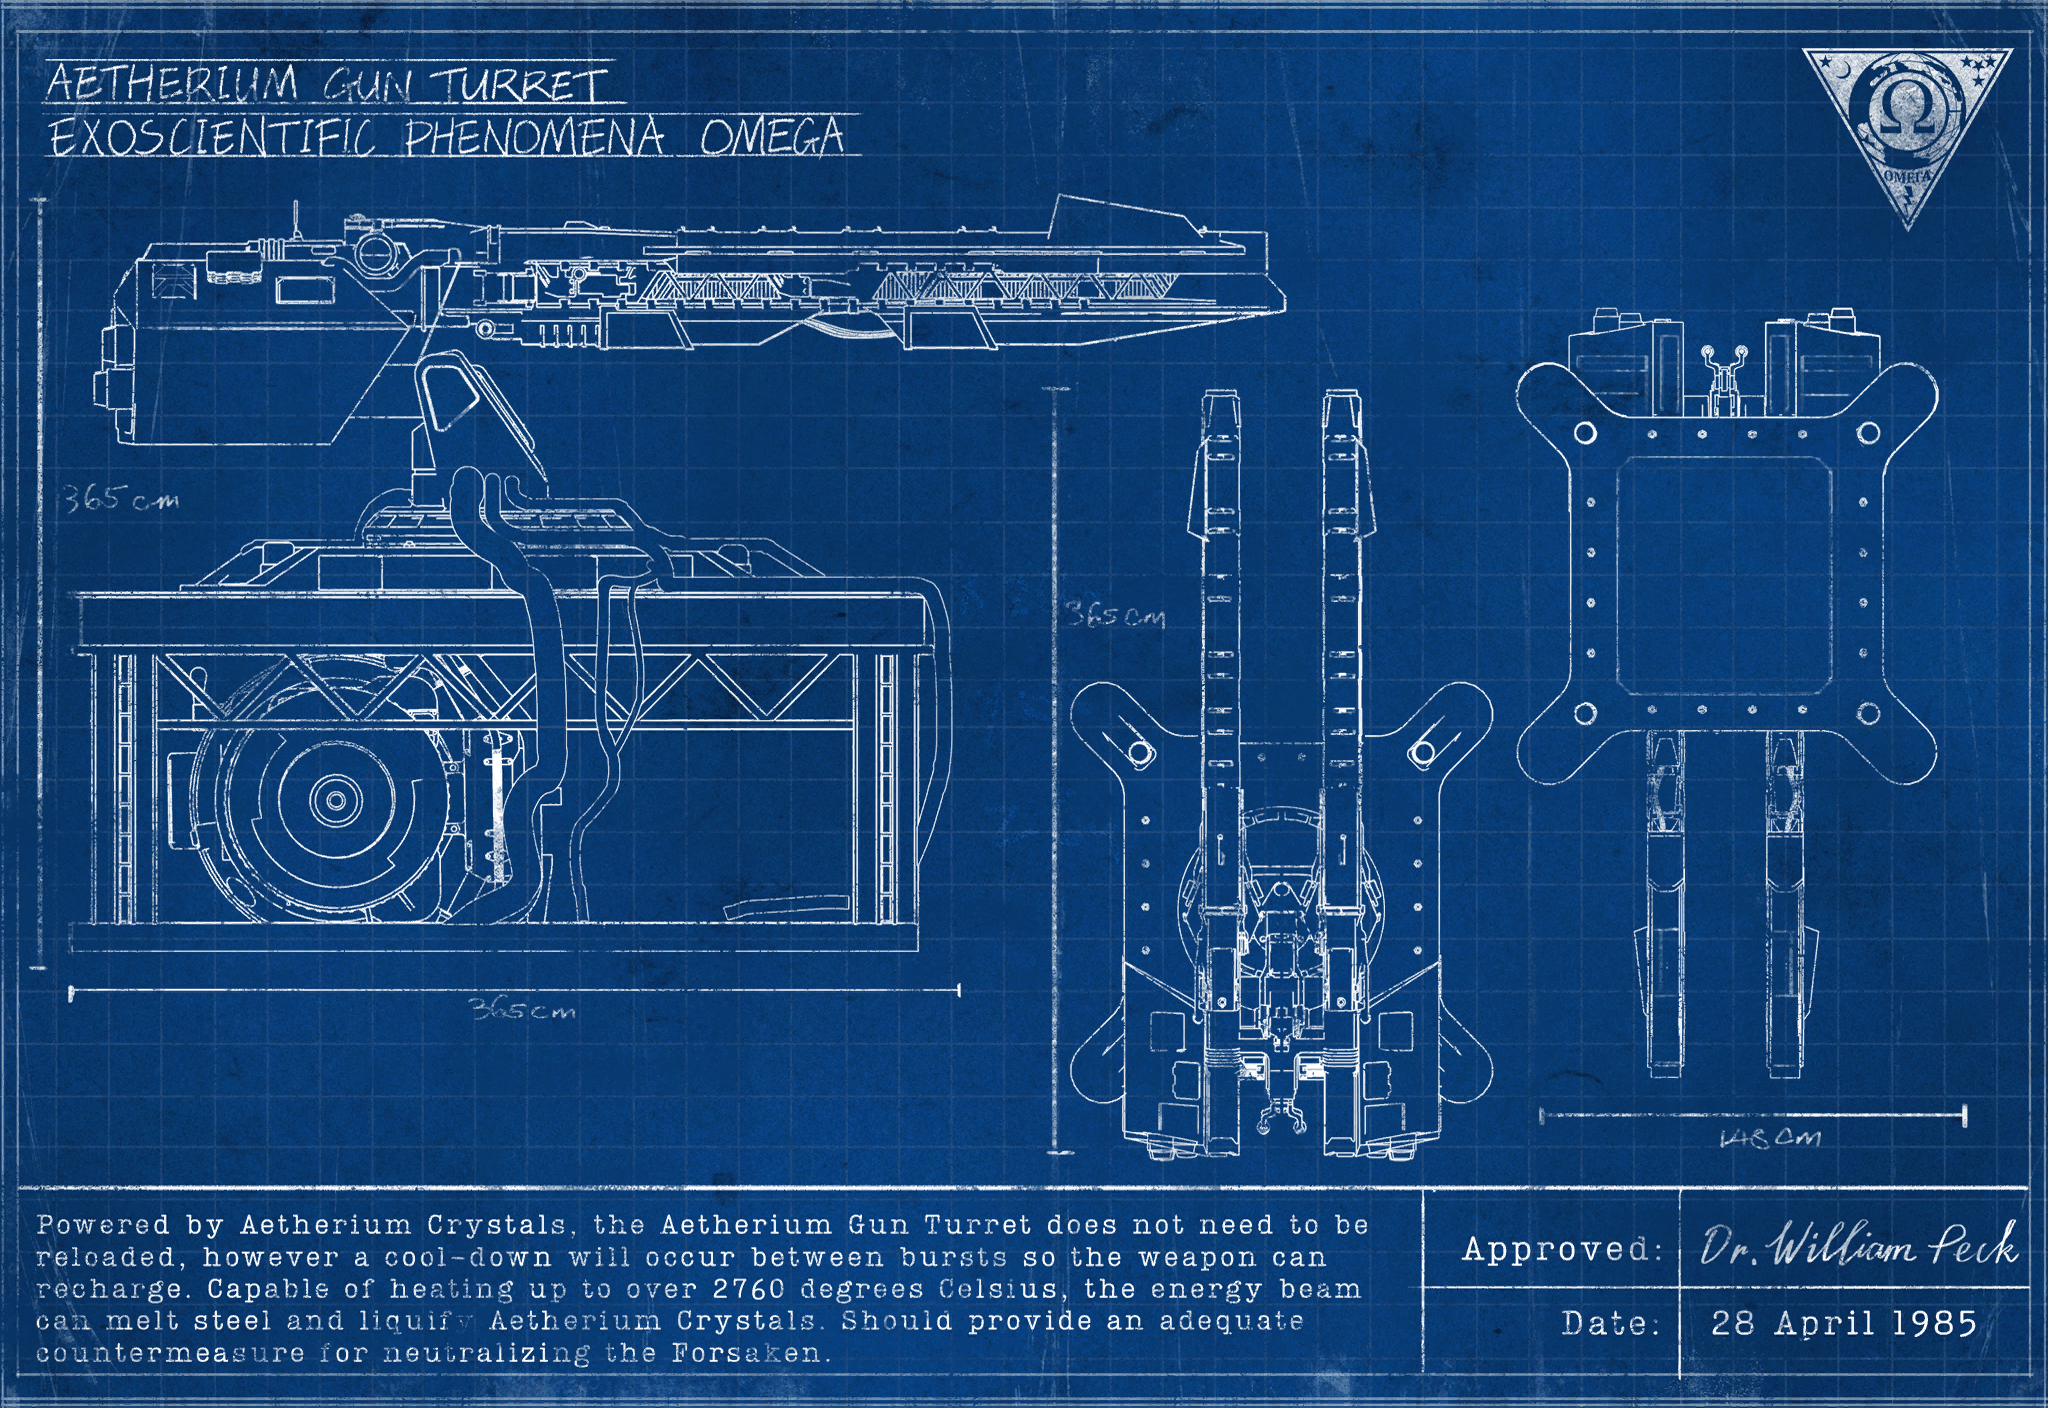
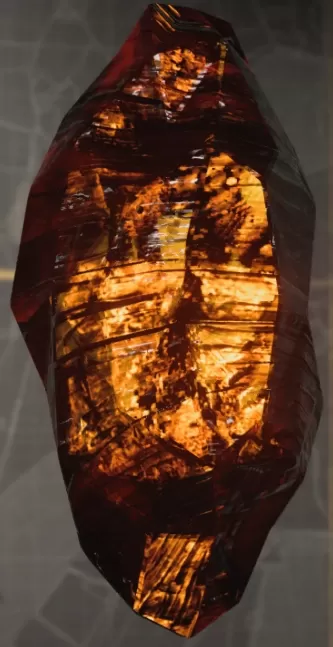
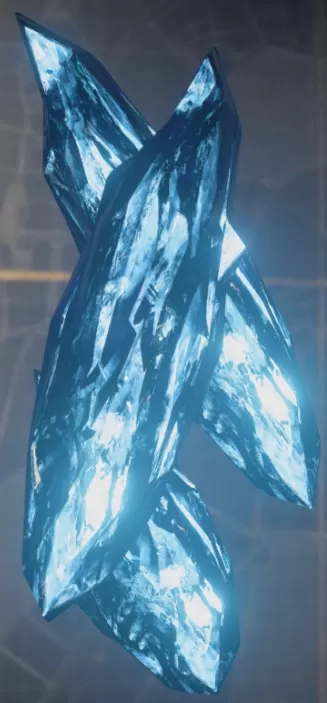
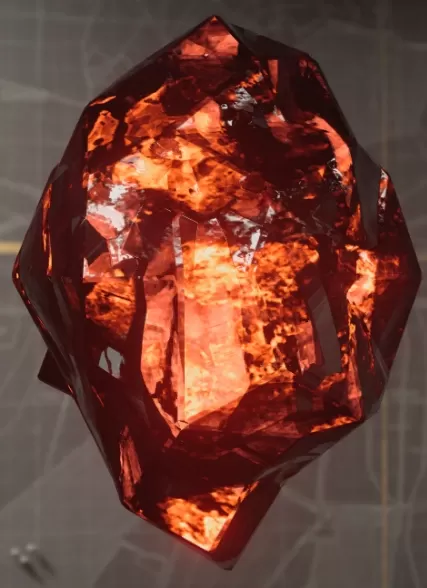
Requiem (15/15) Audio Logs (4) "The Zakarpatska Oblast" - Ravenov reveals to Weaver the location of Operatsiya Izbavitel. "Symbotic Relationship" - Strauss records his findings on three particularly unique crystals - and their special ability to forge an ancient aethereal weapon. "Russian to Russian" - Weaver formally introduces himself to Zykov - and makes a deal. "For Health" - Weaver and Carter share a late night drink and discuss the future. Documents (6) "Ancient Parchment" - A Dark Aether drawing of a deadly Aethereal weapon by the Zealot Sparagmos. "Collapse Report" - A document discussing the environmental collapse and terraforming of several Outbreak Zones around the globe, including the Ural Mountains. "Ancient Parchment 2" - Documentation of the crystals required to forge the Chrysalax by the Zealot Sparagmos. "Requiem Neutralizer Blueprint" - The design for field construction of an Aetherium Neutralizer, if an operator is compromised by the Phase. "Memorandum for the Board" - A memorandum from Requiem's Director discussing the events of Berlin and his involvement. "Progress Report" - A progress report for the Director regarding the progress of another operation. Artifacts (5) "The Chrysalax" - Forged in the pools of the Dark Aether, the Chrysalax combines three crystals, creating an Aetheral weapon that can transform at will between two forms. "Housing Unit" - A sufficient housing unit for constructing an Aetherium Neutralizer in the field. "Monitoring Device" - An adequate monitor for an Aetherium Neutralizer assembled from spare parts, capable of broadcasting status updates to the user. "Fuel Tank" - A makeshift fuel tank for an Aetherium Neutralizer, saucer-shaped to stabilize the volatile catalyzed Aetherium. "Aetherium Neutralizer" - It may not be professionally constructed, but this field-assembled Aetherium Neutralizer will still provide all the necessary protection from areas with high levels of irradiated Aetherium. Omega (13/13) Audio Logs (4) "Fully Operational" - Kravchenko pays an unexpected visit at Test Site Anna - and informs Peck of an alarming schedule update. "Deja Vu" - As Kravchenko and Peck run their eighth attempt to extract Zykov, a catastrophic miscalculation is made. "The Agreement" - Peck makes another phone call. "The Magnificent Two" - Gorev and Jager form a tentative accord should Operation Izbavitel fail. Documents (9) "Operatsiya Izbavitel Approval" - A letter from Chebrikov, giving Omega Group authorization to proceed with Operatsiya Izbavitel. "Order of Operations" - A memorandum from Kravchenko to Omega Department Leads, reviewing the order of operations on the day Operatsiya Inversiya is to be executed. "Test Site Construction Blueprint" - The design specs for the particle accelerator and the Amplifier tunnel at Test Site Anna. "Containment Chamber Blueprint" - The design specs for the Containment Chamber for Operatsiya Inversiya. "Location Targets" - Kravchenko discusses his thoughts on potential targets once Operatsiya Inversiya is complete. "Aetherium Gun Turret Blueprint" - The design specs for the Aetherium Energy Gun Turret, to be used as part of Operatsiya Inversiya. "Forsaken Photograph" - A photograph of the Forsaken, taken in the Dark Aether by one of Omega's Aethernauts. "ARC-XD Blueprint" - The design specs for the ARC-XD, a remote-controlled vehicle, carrying an Aetherium payload, capable of distracting undead enemies. "Anton Note" - A note written by Omega Officer Anton, discussing recent happenings at Test Site Anna. Maxis (4/4) Audio Logs (3) "My Control" - Grey vists Maxis at Requiem's Block 8 facility. "My Orders" - Weaver calls Maxis before Operation First Domino. "My Choice" - Maxis records her final personal log. Documents (1) "Maxis Approval Memo" - A report from the Director authorizing Maxis for Operation First Domino. Dark Aether (4/4) Artifacts (4) "Polymorphic Crystal Core" - Created by the hands of Sparagmos, the polymorphic crystal core can shift its form - the source of the Chrysalax's transformative powers. "Energetic Geode" - Highly volatile, the Energetic Geode is created from a Dark Aether Crystal impacted by an Aetherium energy blast. "Tempered Crystal Heart" - The fiery crystal heart of a Tormentor. "Catalyzed Crystal Shard" - When assembling an Aetherium Neutralizer in the field, catalyzed Aetherium crystals create an acceptable replacement for the Aetherium Orb, if one is not available.
1 point
-
I'm also not convinced it's a full language, but I'm also NOT against the possibility! When I first saw these in Mob/Shadows, my brain immediately went to sacred geometry that had been twisted and deformed into demonic runes. (Here's a few examples of sacred geometry, for those unfamiliar.) Looking back on it now, the "spiritual meaning of various shapes" may have been a huge hint of foreshadowing for BO3/BO4.
1 point
-
I'm glad you've liked it! I still plan to keep it going, I've just had issues with time and motivation.1 point
-
These kind of chapters that do not represent something seen in-game are always interesting and surprising to read. I like it how dr. Okitsu remains a returning character, now instead of being some kind of wicked scientist we really know how evil this person is. Get some kind of Japanese Mengele feeling of this guy. Love the reference to temple complex being buit in the era of the Great War. I must say I am not fully sure why Ultimis went here. Perhaps it is because we aren't supposed to know yet (as far as I know, last chapter they were in Shi no Numa), or did I forgot things?1 point
-
Chapter 8: "The One"1 point
-
Amazing work Rad, you got the real Ultimis vibes described here, the characters come to life. Really laughed at some points as well. Two small points I have "The frame of the device illuminated, and as if it were unable to contain the row energy within" I think this must be 'raw' instead of 'row', but I could be wrong. Another thing is in the Fightclub-like scene that Nikolai and Dempsey start kicking each other for fun, it initially isn't made clear that the other guy is Dempsey. Maybe this is intended, and I already guessed this concerned Dempsey since he would be the only one enjoying such things, but wanted to make sure anyway.1 point
-
Chapter 7: My Way is now up on the site and on the Google Doc: https://www.callofdutyzombies.com/story/book2-ch7/ Also, @Grimmstein made a cover for Book 2: Amazing work as always!1 point
-
Chapter 6: Mystery1 point
-
kudos to anyone who reads all of that.1 point
-
Shadows of Evil introduced us to a new story element that may or may not be implemented into future maps. This element is the Use of Lovecraftian Lore in the form of the Apothicans. Strange Pods growing from the ground and unspeakable blasphemies invading morg city. However is this really the first time we have seen a reference to Lovecraft before? Let us take a look back in Black Ops 2 and World at War as well as take an example from H.P lovecrafts short story. The Colour out of Space. In this short story a meteor falls from the sky and lands in a small town near a farm. Scientists come to experiment on it and discover that the Meteor never cools down and when it does it usually takes a long time. Water around it produces steam and as time goes by it shrinks in size. When the meteor is broken it reveals that the inside resembles Glass and has the distinct characteristic of Colour. Eventually the meteorite vanishes and the people are left to their own devices. However the tale does not end there, hunters notice that the wildlife is changing in the area, they find a rabbit that is deformed and horrendous. Eventually the Crops grow in huge abundance but their taste is bitter and disgusting. Time goes by and animals whither and die. The people begin to go insane until they start to deteriorate and die off in gruesome ways. Eventually whatever was in the meteor begins to rise from the contaminated well and blasts off into space in an array of colors. However one Small piece falls back into the Well. The range of this infection seems to spread an Inch a year. I tell you this story because it has parallels to our own storyline. Shi No Numa takes place in Japan after a meteorite is discovered in the swamps. Of course, this meteorite causes the dead to reanimate but something new was just implemented a few years ago during Origins. In the Cutscene the Meteorite is shown to have landed prior to 1917. Now, this could just be the same event in another dimension but as seen in The Giant we know that Multiple Universes have very similar events occurring at the same exact time. So if we are to assume that the Meteor in Shi No Numa is the same meteor we see in origins then we can safely assume that 30 years later the meteor has still not cooled down. We can also see that the Origins meteor fits the description of the meteor from H.P Lovecraft’s story. When the surface is cracked the inside is like glass displaying Colour. 115 which is found in the Meteor has the same effect as the story. The people begin to whither away and die and animals suffer grim mutations. Zombies and Hellhounds. Hellhounds are shown to have been a product of the Der Riese incident however their first appearance was in Shi No Numa.. So what does this mean in our storyline? Did I just state something that has already mostly been said for years already? Well, here is where it gets interesting. There are some possible Origins for the meteorite in H.P Lovecrafts story. it could have been crafted by beings from another dimension and deliberately sent to earth. Evidence in the story comes from the fact that the radiation spreads one inch a year and how given enough time the entire planet would eventually be engulfed in a Plague which destroys the earth completely. The same can be said for the Zombies meteorite. It was because of this One event that eventually led to the Rift being broken during the events of Moon. It is possible that the Meteor was sent to earth during a critical time in history where it’s scientific properties would be used to create weapons and devices. It was World War II when the meteor landed in Origins timeline, however in the First timeline it could have landed during WWII. What do these 2 events have in common? They both landed during a time of great conflict, when scientists were racing to create a weapon to win the war. It is possible that these meteorites were sent to Multiple realities in hopes that one of these dimensions would eventually and foolishly break the Rift. Without 115 the Teleporters would not have been perfected. The moon pyramid would not have been discovered. Griffon Station would not have been built and the Missiles would have never been sent to earth. There is also something else that casts a shadow on the future. The meteorite surges with electricity. Objects that are teleported often surge with electricity shortly after being teleported. Hellhounds do this, The mainframes do this, and apparently do does our meteor…1 point
-
Not sure why this hasn't been pinned yet, but by god @PINNAZ you are just a legend. It's like - the more I peer back into these older threads, the more I'm realizing that these are treasures and provide wealths of information.1 point
-
I know that the RGM2 is very common on Buried and very rare on Survival maps but what about the other maps like Tranzit, Die Rise and Mob of the Dead? Is it rare to get the RGM2 on these maps like survival maps or is it common like Buried?1 point


.thumb.png.df28620cef3c43fa99a6ea764a072022.png)