
anonymous
-
Posts
2,952 -
Joined
-
Last visited
-
Days Won
302
Content Type
Profiles
News & Announcements
Zombies Library
Easter Egg Guides
Intel
Forums
Everything posted by anonymous
-
 There are two stages to the boss battle. Be warned this can be a timely step. The first stage is just you and your team killing Zombies until Brutus appears. The second stage involves Brutus charging up an attack. Red zones will appear on the ground. Step into the zones and shoot glowing red orbs floating above Brutus. After removing the orbs, shield blast Brutus. An orb will now float above the Blood Machine in the center of the stage. Shield blast the orb. Repeat Steps 1-3 a total of three times. After the third time, have the Player who is Richtofen interact with the Blood Machine (A bot may spawn if the quest is being done in Solo/no Richtofen is available). Take control of Primis Richtofen after a brief cutscene and make your way back to the Boss Fight entrance (where #4 of Step 6 took place). The ending cutscene will occur after your character enters the stage.
 -
 After being released from the jail cells, grab your arsenel from a sack found right before exiting the Cell Block 2nd floor (going into the Library). Make sure you also have your shield! Follow the bird from Step 3 slowly. After Brutus is alerted, head back to Richtofen's Laboratory, being careful of the infinite dog spawns. After watching the Mob of the Dead ghosts fend of Brutus, a red orb will appear like before. Collect it and head inside to the Laboratory, placing the final orb on the map as before. A door will open in the corner of the Laboratory. Enter through and have each player stand on a small pad with yellow lights on the floor at the top of the stairs. You will now enter the Boss Fight.
 -
 Insert all red orbs onto the map in Richtofen's Laboratory as done before. Head back to the Warden's Ritual Room and interact with the Warden's corpse and a cutscene will begin.
 -
 Go back to the Warden's Ritual Room at the top floor of the Warden's house and put the Kronorium on the Warden's corpse. Use the shield to look at the Kronorium, which will give you three numbers. Place these three numbers into the number generator down in the Citadel Tunnels and the lighthouse will show you the location of a portal. Look at and blast the portal using the shield to begin the portal's challenge. There are 5 challenges, and if you mess up any challenge, you will have to repeat the beginning of this step with new numbers. Collect a red orb from each portal, which you will need to collect all of them to progress to Step 5. Here's an excerpt from r/codzombies pertaining to this step for each portal challenge:
 -
 Grab the red orb from the previous step and place it on the spawn map (hanging on the wall). Activate the Kronorium and chase the ghost bird back to the prison. The location of where the bird goes may vary. You will need to use the Spectral Shield to see the bird, but there are several locations including. Note: On the 4th bird, you can only see the bird in Zombie Blood. Listen out for the bird or the Warden crying to locate the area of the bird. Use the number 8-7-2 on the number generator in the Citadel Tunnels to obtain the Zombie Blood. Instead of the shield, throw your Hell's Retriever/Redeemer at the bird and it will drop the Kronorium which you can then pick up. There are 40 possible locations (20 currently listed): Richtofen's Laboratory 2nd floor West Grounds truck Catwalk entrance Recreation Yard on a tall rock Cell Block 2nd floor volt meter (where Electric Cherry used to be) Cell Block near Monkey Bomb statue under 2nd Wolf Head Library top of bookshelf Michigan Avenue across Warden's Office entrance Time's Square above Cafeteria entrance Showers near washing machine Warden's Office entrance Warden's Office above fireplace Warden's Office outside on balcony Roof doorway Citadel Tunnels as you go down from Warden's Office Citadel Tunnels right of number generator Citadel Tunnels on number generator Citadel Tunnels on a sandbag Citadel Tunnels outside near power room Docks near perk machine
 -
 Obtain the Spoon (or Golden Spork) Melee Weapon. After doing so, go to the Warden's House and melee the wall across from the zombie barrier and Titan Wallbuy with the Silver Spoon / Golden Spork to scratch the wallpaper. (Optimally, you could melee the wall with the Silver Spoon then focus on upgrading it to the Golden Spork while waiting for Round 17 if you don't start early using Monkey Bombs, see below.) Make the Warden use his Slam attack in front of the now scratched wall, either naturally starting on Round 17 or sooner by having him interact with a Monkey Bomb in front of the wall. (You can obtain a Monkey Bombs either through the Mystery Box or completing the Monkey Bomb Statue ritual in Cell Block, but they will replace your Hell's Retriever.) Interact with the electronic switch inside the Warden's Ritual Room and watch as the Warden's corpse becomes revealed, dead on an electric chair. Take the small, glowing red orb on the table to the left of the Warden's body.
 -
Remember when we called Primis the nO4. I remember...
-
With the upcoming continuation of our beloved story, let's not forget about the disgusting treatment of human beings at the Treyarch facility, the place where workers are mentally broken. Treyarch's money and our joy are at the cost of their lives. The gaming industry must change: https://kotaku.com/the-human-cost-of-call-of-duty-black-ops-4-1835859016
(And that while, ironically, CoD Zombies was the cause of an open-minded and creative individual not only doing what his boss told him but also putting his free will and time into developing this 'bonus mode')
-
 Now you will have to locate three items around the map and shoot them with any weapon. Every time you shoot one Samantha will confirm this by saying something. The locations of the items are: A Teddy Bear holding a Bowie Knife: Above the M1A1 Carbine wallbuy on a window high up the building overlooking the Courtyard A Monkey Bomb holding a Stielhandgranate and a Molotov Cocktail: In the open furnace in the Furnace Room, near the Thompson wallbuy A Teddy Bear holding a Juggernog bottle and an upgraded M1911: In a cage in the Animal Labs, next to the M1897 Trench Gun wallbuy. After shooting the final one, the Main Quest is done and Samantha will scream: "You win... GAME OVER!". In World at War, the player will be awarded with the trophy or achievement 'Elevate Your Senses'.
 -
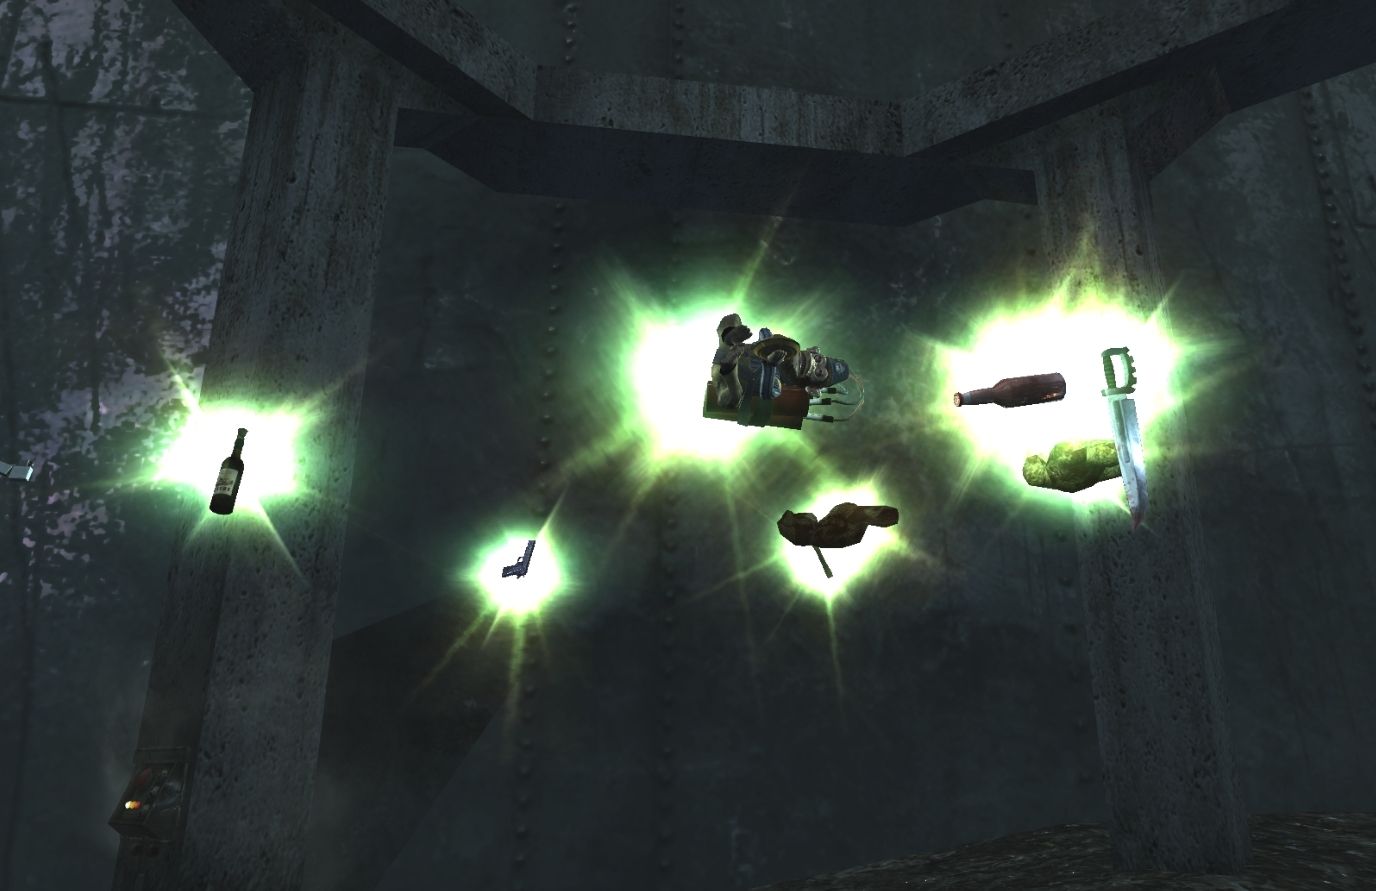 To do this step, the player must obtain a Pack-a-Punched weapon. Now, you have to go the alleyway in the direction of the animal labs, outside at the M1 Carbine wall-buy location. Look outside the barrier: Far in the distance you will notice a control panel on a pillar. Shoot it with your upgraded weapon or throw a grenade at it. If done correctly, you should hear Samantha say: Several items around the pillar will be emit a green glow and start to fly up in the sky and disappear.
 -
 Activating the Pack-a-Punch machine is a relatively easy step. First, one has to open enough doors to gain access to all three Matter Transference Devices (M.T.D.'s), also known as Teleporters. The following map perfectly indicates the three locations: Now, you have to link them to the mainframe in the spawn room. To do this, step inside an MTD and press your activation button, which will be followed by a mechanical noise and the appearance of a clock on your screen counting down from 30 seconds. Within this time period, someone must go to the mainframe and activate the receiving pad in front of the Pack-a-Punch machine. Do this with each MTD until the door is fully open. This will permanently allow the players access to the Pack-a-Punch machine.
 -
What is that "Olympic Champion" rank you've got?
-

@anonymous a couple of years ago there was a tournament on this site and he and another player I forgot the name of have won it.
-

-
-
Entry 114.98 It works! Like I said in the last entry, Die Glocke, the flightdevice, is transportated from the Der Riese facility to here, the airfield. Funny that they call this bunker “the airfield”, it doesn’t even has enough place for a plane to land. Every plane that would land here would crash, I am sure about that. But Die Glocke is no plane, its an antigravitydevice running by a Vrill element, or well, officer Hermann says so. Personally I think its only made by iron. But nothing of that matters: It works! I flies! To keep it hidden for the Allies, we tested it at night, when it was dark. My job is to control the red antennae on the roof of this building and at towers in the forrest. Very important, because otherwise the pilot wouldn’t see where he flies and he could crash our newest wunderweapon. Dr. Johnson, the American of whom I once wrote called today “A huge milestone in the history of science”. He said that Group 935 finally succeed in something. Entry 114.99 This is a hell. Apparently it was true what officer Hermann said about the Vrill element. Yesterday, everything seemed fine with the tests, but Die Glocke left a bit of the element in the air when it flew around. This caused a resurrection of hunderds of dead soldiers. While they make the most awfull noises, they are attacking the bunker, right now. All soldiers were ordered to barricade the windows and doors, and let nothing inside until the Wehrmacht arrives here to clear this site of the undead. Fritz hid Die Glocke at the roof, to make sure it won’t be harmed by them. In case we won’t survive this, he has written messages on the walls in which he refers that the machine is hidden at the roof, for the Wehrmacht. Everybody is trying to keep the living dead outside, but our ammunition is running out. Dr. Johnson was sure we won’t survive this and he sent pictures of this bunker and an explanation of what we did here to his son in America, Marlton. How you may ask? A homing pigeon. Many times the old ways are the best. Everybody who tells family of what we do here will punished with death, even Dr. Johnson. But he didn’t care. He says we are dead anyway… Entry 115 They are inside. We won’t make it. We won’t make it though this nacht der untoten.
-

Zombie Eye Color & Who is in Control
anonymous replied to AetherialVoices's topic in Story Discussion
In Avadacadavre we hear that Samantha, who is in the MPD, realizes she becomes more and more evil. Originally, she was just a normal kind girl. Richthofen was a normal guy before he touched the MPD too. We all agree there is something evil with that device, but that there has more then one faction to do with this, is something new, at least, I never heard someone say that. But there is a possibility that that is true. The blue eyed zombies in Origins come from the Crazy place, a gateway to the Agartha, Vrill Ya's home. Richthofen is in the MPD, a Vrill device, so there could be Vrill influence there too. But then I wonder, why is Samantha yellow. She is also in a Vrill device. And I actually think the eyes in all BO3 maps are more orange then yellow. The green eyes, its strange that almost no one talks about it. I don't think they did it just for the gameplay, I mean, Treyarch knows how much confusion it brings to codz communities. If they would do it just for gameplay, they could made a green cloud around the zombies. Perhaps this is the Apothican colour. The island is Cthulus home. If Apothican colour would be yellow, why would the overlords send zombies on the SoE4 if the shadowman needs their help? But if green is Apothican, what is yellow? Oh, so confuzing -
It is normal now again, thank you so much
-
Uhmm, I did something stupid. In a post I couldn't see the images so I thought: "Perhaps it helps if I change the theme". I was on my phone and I saw the mobile theme, so I selected that one. But now I can't click on themes again to change it back. Will it change back automaticly once?
-
@MysteryMachineX made a word document which you can open in his post "A zombie trilogy VII". It holds loads of information, and its his view on the story, but I think its mostly true and worth to take a look (its still WIP). Furthermore, like my friend @NaBrZHunter told me when I was new to this site: Experience it yourself. Find and activate the radios on maps like Der Riese, Moon and Shi No Numa and later on the other maps. Really interesting stuff there.
-
I also play only BO1, WaW and BO2. If you ever need a teammate, just say it. Welcome to the site. I see you're interested in the story. If you have any questions about it or about this site or about anything else, feel free to ask, however the story is something no one exacly knows.
-
Hahaha, well country neightboor, I had exacly the same when a I played zombies in Kino for the first time. I didn't knew there were doors to open so I always bought an Olympia and so I always died when the hounds came. But its great to have you here, and I still recognize you as #1 code cracker on this site. And indeed, better late then never, I also never made my introductions. When I feel like I will once.
-
Not this time. I think the nO4 will be at DLC4 too, but perhaps we'll see something of the N4 once(on a monitor or something, or in a quote). I hope so anyway
-
Sorry I am so late, but welcome. I saw your posts which look very interesting. The whole Agartha and Vrill Ya part of the story is very hard, but I self like to hear about them too. Glad you joined us
-
Welcome to the site, hope you enjoy your stay here. Like @Doppelgänger said, feel free to ask anything if you have questions, as well about the site as the zombie story
-
The most confuzing loading screen I think is still the NDU one. Perhaps the boxes represent universes. It wouldnt make sense why the country flags are on it, though. And that portal the guy goes though is the same as the Keeper goes though on the drawing in Samanthas room in DE. Thank you for that, a very interesting post. Unfortunately, MixmasterNut says he cannot read the text I talked about. So I dont think it holds any significance on the old loading screen
-
The excavator has indeed simularities of that Nasa sattelite thing. One big difference, the excavation drill is on a planet, possibly Earth, while the satelite is in space. The last two panels of the Nuketown loading screen always annoy me: Someone with a mask on, like he is in space or in a jet, and the wings of a plane or spaceshuttle. Talking about loadingscreens, yesterday I discovered the word "Samantha" on that new moon loading screen in the Treyarch zombie history clip. Its above the Shangri La Idol picture. On the old moon loading screen, there is something else there, but all pictures on internet failed in quality to see what. I though, perhaps you see it more clear when you play moon on a big screen, like a TV. Unfortunately, Im unable to use my xbox these days. Perhaps someone can take a look.

