

KronoriumExcerptB
-
Posts
290 -
Joined
-
Last visited
-
Days Won
5
About KronoriumExcerptB

-
Rank
Newbie
")
Recent Profile Visitors
3,982 profile views


-
 Locate a door on the right side of the River of Sorrow, from where you initially came to the underworld. When numbering the symbols on the door from left to right, shoot the following symbols in this order: 12, 2, 15, 19, 6, 9 Or if easier, these are the locations of the symbols: 3rd row #2, 1st row #2, 3rd row #5, 4th row #4, 2nd row #1, 2nd row #4. Shaw and Bruno must interact with the door. If not on the map, Shaw and Bruno Bots will spawn. Place a Pegasus Strike on the blue symbol at the top of the River of Sorrow. Pegasus will raise a crossbow from the river. Use a charged shot from the upgraded Hand of Ouranos to make the crossbow turn. Keep holding the shot until the crossbow stops moving. Dip your shield into the Eternal Flame at spawn, then use the Venom trap near PaP and walk through it, still with your shield out. Your shield should have a green fire. Go back to the crossbow and melee it with your shield. Above PaP, the entry to the boss fight is available.
 -
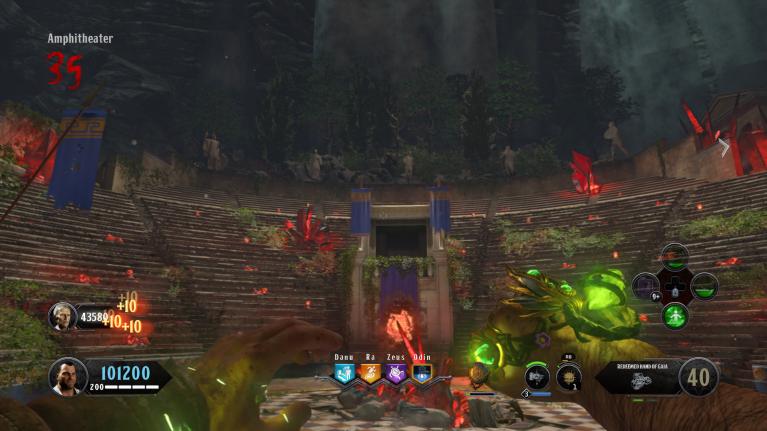 Navigate to the Amphitheater with a Redeemed Hand of a God. If in co-op, all players must be there with Redeemed Hands. The players will have to kill zombies corresponding to the color of their Gauntlet. A circle will appear of each Gauntlet's color directing the player with that Gauntlet where to go. If the player is forced inside the acting area itself, they will have to kill zombies corresponding to their gauntlet's color. Depending on the distance or the number of zombies, either a charge shot or a single shot of the Gauntlet will need to be used. After 5 rounds, there will be intermissions and the characters will give a success quote. Complete 3 iterations of those 5 rounds for a total of 15, and the step is complete. If you fail at any time, you have to completely reset the step and do all 15 over again.
 -
There are two parts to this step, which can be completed in either order. 1: Use the Hand of Gaia to shoot 4 symbols in quick succession at the Offering of the Attalids. Each symbol should light up after it is successfully shot. When all symbols are complete, a Gegenees will spawn, and upon killing it, it will drop a golden pole. Place the Golden Pole in the Sundial at the Offering of the Attalids. Electric Catalysts will begin to spawn amongst the standard horde, kill one over the Sundial to cause a slot to open up. There will a line of electricity that leads to a specific slot on the outside of the sundial. Wait until the blue symbol is over that line, and then hold interact. Count the number of gold spaces between the slot and the line of electricity, and use that to determine when to hold interact. If the slot is 5 gold spaces away from the electricity, wait for 5 changes of the symbol to hold interact. Repeat this process 2 more times, and the slot will gradually go further inside and become faster. 2: There is an Ankh stuck inside a crystal at the Intersection of Treasuries. Get a Gegenees over to the area, and coerce it into a shield blast to drop the Ankh. Before proceeding with this step, make sure you're ready for a big lockdown fight. Place the Ankh into the hand of the Ra Perk Statue. Ra will fire a beam, protect the beam from skeletons that try to block it while fighting blightfathers and many other enemies. If you complete the lockdown successfully, Ra's Beam will pierce the wall, and a scepter will be in the hole left by the beam. Place the Scepter in Ra's hands, and the step is complete.
-
 KronoriumExcerptB changed their profile photo
 -
Three sets of cogs must be found around the map. One is at the Spartan Monument One is at the Intersection of Treasuries, close to the Ra Perk. One is at the Intersection of Treasuries, close to the Stoa of the Athenians. You must throw a spear from the shield at the cogs right as the cogs begin to touch. If the cogs are stuck on each other and both are spinning, you were successful. When all three are done, head to the Stoa of the Athenians. Three statues should be spinning. Time the spear to throw it at the cog when all three statues face inside. If successful, your screen should shake.
-
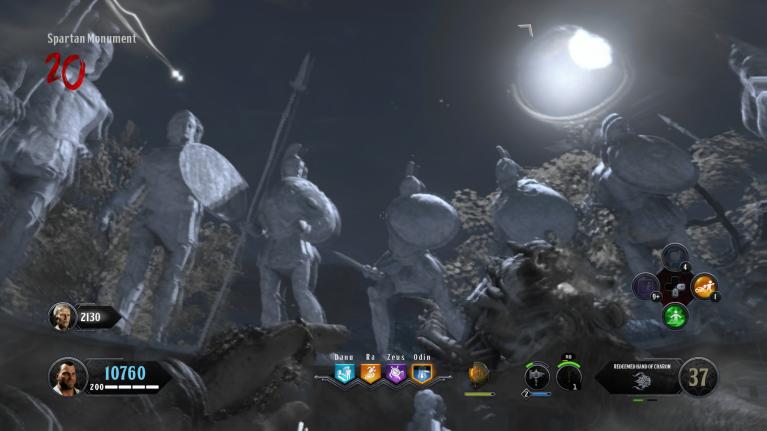 Go to the Spartan monument. Shoot a charged Redeemed Hand of Charon shot near the Zeus perk, on the ground between the 14 statues. Look at the statues, one should have glowing blue eyes. Shoot that statue with the Hand of Charon, and another statue should have the blue eyes. Shoot a total of 4 statues. Your screen should shake once again if you are successful.
 -
Melee the Eternal Flame with the Shield and burn 3 oil spills around the map by meleeing the spills. One is on a rock in the Upper Road. One is on a wall in the Spartan Monument. One is on a wall in the Intersection of Treasuries. Your screen should shake once all three have been burned.
-
To complete the Quest, you will need the shield, the Pegasus Strike, and all 4 Gauntlets, with all except Gaia being upgraded. To light the Eternal Flame and begin the Easter Egg, you will need to complete the Oracle's challenges. On 1-Player, claim 2 epic rewards On 2-Player, claim 3 epic rewards On 3-Player, claim 4 epic rewards On 4-player, claim 5 epic rewards You'll know that you are successful when the Flame turns blue.
-
 Before beginning this step, make sure your guns are Pack a Punched and that you're ready for a big fight. Give the Seal to the Hermit. This will trigger a lengthy lockdown sequence in the lighthouse. After finishing the lockdown, take the seal back from the Hermit and follow the Lighthouse beam to PaP machines. Place the Seal into the machine and fill it with Zombie souls. Repeat this process for every PaP machine. The order is typically Beach---->Lagoon----> Sunken Path----->Boathouse After placing the Seal in these 4 PaP Machines, return the Seal to the Blood. Repeat the step of shooting the Blood and freezing the orange orbs, then place the Seal onto the campfire and throw Sam's music box at it. After the dialogue finishes, collect the Seal and head to the Golden PaP flinger on the Sun Deck. Place the Seal into the Golden PaP. This will trigger the boss fight. There is a radius of safety near the Agarthan Device. You will take damage if you go anywhere else. Stick close to the Agarthan Device. If you lose track of it, you can see it through walls with a green outline. The Device will sometimes stop, which means that there will be a brief soul collecting phase, after which there will be a carpenter and max ammo. Keep an eye out for lava sections, where you will have to do a few jumps on stones to avoid lava damage. The Agarthan Device begins in the Forecastle, it quickly travels to the Main Deck, where there is a lockdown event. The Device will take the stairs down from the main deck into the Cargo Hold, and then into the Artifact Storage. The first lava section is in Artifact Storage. The Device then travels through the Sunken Path, to the Lagoon, and then has a lockdown event at the Lighthouse Cove. From the Cove, it takes the Hidden Path, with a brief lava section. It drops onto the Beach, through the Lighthouse approach, and has a lockdown event in the Lighthouse Station. The Device then travels up the lighthouse and takes the zipline to the Facility. Importantly, wait as long as possible before taking the Zipline, so you don't take too much damage from getting to the Facility too early. The Device goes through Decontamination, down into Human Infusion, where it stops for the last time. This final lockdown sequence is not about kills, but about time. You must survive for roughly 1 minute 15 seconds, as the radius of the Device's protection gets smaller and smaller. A special weapon is highly recommended for the ending, when the radius is tiny and nearly impossible to survive without. After completing this lockdown, you will receive one final bit of dialogue. Take the Device, and give it to the Hermit. Travel to the Sun Deck, and the Hermit will fulfill his destiny. The Device will drop to the Forecastle. Take the Device and the cutscene will play.