Jump to content

RadZakpak

Moderators
  • Posts

    1,328
  • Joined

  • Last visited

  • Days Won

    225

Everything posted by RadZakpak

  1. On the opposite side of the room from Sophia is a large screen. Below the screen you can place down the trophies you have collected. The button in the middle should now be green, and interacting with it should start a new random, uncompleted challenge. During each challenge, zombies will spawn infinitely. If you fail a challenge, you must wait until the next round and go back to the button to activate your challenge again. You will need to complete all six challenges to head to the boss fight. NOTE BEFORE STARTING A CHALLENGE: The Bomb Challenge will present to you a sequence of locations on the map that you must note the order of, so read through that challenge description first. You should have a camera ready or be able to note the order quickly as failing this challenge will instantly kill any players in the game even remotely near the bombs around the map, which can potentially end the entire run. You can fail it by running out of time or deactivating bombs in a wrong order. When initiating a new Challenge, lights will circulate between the trophies before settling on one. Based on the trophy and Sophia's instructions you can figure out which Challenge must be completed. The Challenges based on trophies from left to right are: The Gersh Challenge The Bomb Challenge The Mangler Challenge The Valkyrie Challenge The Group 935 Challenge (This Challenge always comes last) The Groph Module Challenge
  2. Go to the room under the house where you incubated the egg, and notice a generator covered by a green tarp to the right of the incubation machine. Wait for a Valkyrie Drone to spawn, and kill it near the generator so that it explodes nearby. The generator will now turn on for a limited time. If you fail to acquire the cylinder in time, go back to the generator and interact with it to restart. [generator] Around the map are six valves; one of them has a green light above, and one of them has a pink cylinder floating around inside the valve. Note these locations, and input them into this website. It will give you a list of numbers to change the valves to around the map. If you've done this correctly, you can return to where you saw the cylinder, and it will be available for you to pick up. Here is a map showing the locations of these valves on the map: http://www.kronorium.com/img/locations.png Go to Dragon Command and go up to Sophia. Interact with her and wait for her to finish speaking. You can then place the cylinder into the machine. Letters should now show up vertically on the machine, and you must type in a password by shooting the letters to change them. The password is KRONOS. With the password ready, interact with Sophia again.
  3. There are six trophies around the map acquired through various means that you will need to advance the quest. Outside of Dragon Command is a tank and above it on a wall there is a mural of Russian soldiers. Shoot the trophy out of the hand of the one on the right, and it will drop down for you to pick up. At the Tank Factory next to Double Tap is a window seemingly held open by nothing. Blast it with the Guard of Fafnir and the trophy should pop up. After going to the house with Pack-a-Punch, drop into the sewer and as you are being sent back to the spawn room, look up towards the top of the sewer. There should be a red light and switch that you must shoot as you pass under it. If it turns green, you can head back to the house again, and on the ground floor there should be a toilet now clogged with the trophy sitting in it. In the Supply Depot, activate the Laser Trap for 1500 points. On the floor where the laser impacts, you should now be able to acquire the trophy. Drop down from Speed Cola near the Supply Depot. Near the wall is a puddle of water. Aim the Dragon Strike on this spot to cause the trophy to spawn. After acquiring the Gauntlet of Siegfried, head to the safe next to the shield build table. Release the whelp from the Gauntlet, and then punch the safe open. The trophy is inside.
  4. Suspense is what I was going for by playing with expectations. I was never quite sure if the S.O.P.H.I.A. robot was limited to only the fracture, which I believe she is now, but I don't believe this version of Maxis would do such a thing, despite how low his life has gone. He's dug himself in too deep, and now he wants nothing else than a quick escape to restart his family life.
  5. Believe it or not, Chapter 24: "Pygmalion" is finally ready to read. I put in several hours trying to update the site version of the Storybook, but it is still way too finicky and I need a better solution for copying over the updated chapters. For now, check out the newest version of the Storybook here: https://docs.google.com/document/d/119PjSqvTF3pVxpt7SW2YC9AXeOYYVObOCDe-zwwqfL0/edit?usp=sharing You can click to view the latest chapter using the outline on the left. With the doc you can also add comments on the right, so if I've made any mistakes, let me know. I hope you guys enjoy, as it felt good to come back and finish! I know it's been a while since I've updated, so if you are new and have not read any of the Storybook, check out the OP for more info and read from the link I posted above. I also went back and updated Chapter 16: "I Will Build My Church" to fit the new information we have about the Angola excavation and finding Jeb Brown's work.
  6. You may now enter the elevator, and interacting with the panel inside will take you to the lower level where the boss fight is. By this point you should be prepared with good weapons and perks, shields, a gas mask, and someone with the Masamune. Using the Masamune, shoot some orange spores out of your path to get into the room. To start the fight, shoot one of the four arms that has a glowing orange spore with the Masamune. Many Thrashers and spiders will spawn. Start running around, killing as many as you can, avoiding the arms as they slam to the ground. Occasionally after killing enough Thrashers a max ammo will spawn in the middle of the room. Once one of the arms of the boss has a glowing orange spot, shoot it with the Masamune to damage Takeo. Repeat this two more times and the fight will be over. The trickiest part is simply surviving long enough until the orange spores are revealed. The cutscene should then play and you will have completed Seeds of Doubt.
  7. You must collect three cogs to repair the elevator to the boss fight: 1. Use the Anywhere But Here! Gobblegum at any point after you mesmerized the poster, and you will be teleported into an Egg Hatching Room, and a cog will be on the floor to collect. You can then drop down to one of the laboratories to leave. 2. Electrify your shield the same way you did when upgrading the KT-4, and approach the zipline at the laboratory. Pay attention to a small dock below the zipline. On that dock is the cog, and you must take the zipline, and drop at the precise time onto the dock. In Solo, you should electrify the panel, then take the zipline, and knife while you are over the dock. In Co-Op, one player should take the zipline, and the other should electrify the panel while the other is over the dock. Be very careful here as you can drop into the water and die. You can do this from either side of the zipline. Once you are on the dock, collect the cog. 3. Plant seeds anywhere on the map, and water them with Blue Water, then shoot them with the KT-4/Masamune. Do this three times, and there is a chance that it will grow into a plant you can open and reveal an AA Shell. Pick up the AA Shell, and approach an AA gun to the right as you enter the bunker, where the KN-44 wallbuy is. Over time, a cargo plane will repeatedly fly over the map and in the path of the AA Gun. Simply interact with the AA Gun to place the shell inside, and then wait for the plane to be directly in its line of sight. Once it is, interact with the gun to fire and destroy the plane. If you destroy it, a cog will fly to one of three locations on the map and will be smoking. It can be on the right path to the Blue Water, near the bunker entrance, or near the Green Water. With all three cogs collected, go to the entrance to the bunker, and upon entering and to the left is an elevator close off. Use the Skull of Nan Sapwe to mesmerize the wall to the left of the elevator, to reveal an area where you can place the cogs into the machine.
  8. First, acquire the KT-4 by collecting three parts: 1. A vial, which spawns on a glowing zombie. Once killed, the vial will drop to be picked up. 2. A sample of Spider Venom, which can be obtained at Lab A. Approach the Panel adjacent to the cage and activate it - causing the cage to lower. Then, lure a spider into the cage, by standing near it. Return to the panel and activate it, upon which the spider will be killed and the venom will be produced. 3. A special plant, obtained in the underwater section past Mule Kick. Continue down through the watery cavern until reaching the bottom, where the plant can be found. (Note, it is recommended the player shoot the spore to the left of the plant in order to replenish their oxygen) With these three parts, locate the table in the room just before Mule Kick which has the KT-4 suspended on it, and add the three items, crafting the KT-4. If you lose the KT-4, it can be reacquired from the box. To upgrade the KT-4, you need to acquire three more items and place them at a table adjacent to the original in the same room. 1. An upgraded vial, which can be obtained in a new area underneath Lab B. First, every player in the game must complete their challenges at the Shrine of Nan Sapwe, to the far right from spawn. Once all challenges are complete, lightning will occasionally strike the shrine, and electrify the ground. A player with the shield should stand in this electricity with it out to electrify their shield. Now, go to the laboratory near Green Water, and electrify a panel near the cage. A player should step inside. In Solo, the cage will lower on its own. In Co-Op, another player must lower the cage. In the area where you are lowered, collect a vial inside a skeleton found there. 2. An upgraded sample of Spider Venom, which can be obtained by defeating the Spider mini-boss. Past the blue water outside Lab A, glowing webs can be found blocking a passageway. These must be shot with the KT-4, opening a slide down to the boss-arena. The Spider will shoot webs and spawn smaller spiders, and at some points its mouth will glow orange, at which point it should be shot there. It will jolt back after enough damage three times, before eventually dying. Once it dies, approach its mouth and collect one of its fangs (Note: there is no prompt for this). Exit the cave up ahead, passing a pool where you can obtain free Widows Wine. 3. From the room where the KT-4 was initially built, use the fast travel pipe to Lab B. Midway through the travel, you will pass a spot with glowing rocks, and should interact at a precise moment to pick up rainbow water. You will know you have picked it up when the bucket icon appears full of water. Now return to the underwater cavern, and with the Skull of Nan Sapwe, mesmerize the wall to the right of where the plant was obtained. A hidden room will be revealed with a spot to plant a seed. Plant a seed, and water it with rainbow water for three consecutive rounds. You can then pick up the plant. (The Rainbow Water can be obtained once this 115 rock is on screen) Now you can craft the upgraded KT-4, the Masamune, which you will need for this quest by placing the three items at the table next to the original.
  9. NOTE: Before even entering a game of Zetsubou No Shima, one player should have the Anywhere But Here! Gobblegum equipped. Around the map there are four pedestals with a set of symbols on them. You will need to note the symbols on them, and approach the Temple of Nan Sapwe where you can read your challenges, and in the center are four red skulls with symbols under them. Pick up the skull with the symbols for each pedestal, and then place the skull down to begin a short mini-game where you defend the pedestal from zombies, spiders, and sometimes Thrashers. The pedestals are located at the following locations: 1. In the spawn room: 2. Near the airplane trap: 3. At the bottom end of the zipline, near power: 4. In the room where you build the KT-4, near Mule Kick: As you defend the skulls, going down or allowing the zombies to do enough damage will force you to grab the skull and place it down again. Once cleansed, however, pick the skull back up and return it to where you found it. After each skull is cleansed, an electric burst will hit the Temple and a fallen tree will rise into the air, revealing a staircase. Go down the staircase, and interact with the Skull of Nan Sapwe. Corrupted Keepers will begin to spawn and attack you. Simply survive long enough until they disappear, and you can pick the skull up. With the Skull acquired, go into the bunker where the Purple Water is found, and across from it is half a poster on the wall. Pull out the skull, and hold the left trigger to mesmerize this poster and reveal the second half, and the rest of the Easter Egg can begin.
  10. Every player should be prepared for the upcoming bossfight with whatever weapons, gobblegums, and shields they need. Each player should place the Ragnarok DG-4's on one of the blue panels around the pyramid using the left trigger. If you don't already have them, here at the locations. Killing Pandzer Activating the death ray, then using the wundersphere to collect it. Rocket test site, when rocket test goes off, activate switch and go back inside Once rocket test is finished, activate switch on computer and then the part will spawn inside the teleporter. Once you have placed the four Ragnarok DG-4's around the pyramid, you will then be transferred into the boss fight The Keeper will soon spawn along with many skeletons and begin its attacks. Simply survive until the Keeper returns to the middle of the arena, and a ball of white electricity appears below him. Immediately, a player should place down Ragnarok DG-4's below the Keeper to stun him once he descends. Then, the symbol on his chest will glow orange, and every player should damage this symbol as much as possible while avoiding death by the skeletons. If you do not place the Ragnarok DG-4's under the Keeper in time, he will do an attack that instantly downs all players not hidden behind a pillar. So it is crucial you place them down quickly to avoid death. If enough damage is done, the screen will shake and the next stage will begin. Panzers and more skeletons will begin to spawn, as well as a max ammo in the center. Survive and kill to charge your Ragnaroks. Eventually the Keeper will spawn again, and you should repeat the process of placing the Ragnaroks under him during his attack, and shooting his chest symbol. You will repeat this process one more time, as even more Panzers and eventually Hellhounds begin to spawn. With each successive appearance, the symbol on his chest will have more and more health. After the third time successfully damaging his chest, he will be defeated, and you will be returned to the map. Pick up the Summoning Key from the MPD. Then place the Summoning Key at the computers at the top of the castle near the clock tower, and watch as rockets destroy the Moon. The cutscene will then begin, and you have completed My Brother's Keeper.
  11. By this point, you should have at least one bow upgraded per player. It is recommended you do not upgrade more than you have to. You should now shoot the four wisps in the same way you did in step 2, and teleport back in time once again. You will be in the same room, but must approach and interact with a computer to the right: Then, approach a box near the wall opposite the teleporter which should now be open, revealing a stone tablet. Pick up the tablet, and wait to return to the map. Now in the center of the courtyard where the pod crashed down, there should be a Vril Rod on the ground to pick up. With the Vril Rod and Tablet in hand, approach the tomb in front of the Wrath of the Ancients, and place the Rod inside the tomb. A Keeper Ghost will now spawn, and wander the map to one of four locations. The Keeper will approach one of four tablets, and when it stops, a ring will spawn on the ground. When you stand inside, the ring will widen, and a color will surround your screen corresponding to one of the upgraded bows. Whoever is holding that bow should simply gets kills, and souls will begin to enter the Keeper. At the end of the round, the Keeper will begin to move if enough souls have been collected. Here are the four locations the Keeper will go: 1. The courtyard: 2. The tunnel near Mule Kick: 3. The junction near Double Tap (At this location, there is a spot on the wall next to the Keeper where there should be a tablet. Place the tablet here to begin collecting souls.): 4. The knight room by power: After the fourth time, the Keeper will fully materialize, and approach the pyramid in the undercroft. It will teleport the MPD into the room, and in one of the corners of the pyramid, a canister will be missing and black gas leaking. Place the blue cylinder you picked up earlier here.
  12. With the items from the safe, return to the Tesla Trap, and below each Tesla Coil, there should be some rods that shoot electricity up to the top, with one missing on each. You can place the rods you acquired from the safe into these spots. Now switch the generator from protect to destroy. Now you must play a game of Simon Says at the computers you interacted with earlier, and at the computers at the rocket test site. The way the game works is, after interacting with the computers, the four symbols will appear for a short time, and you must remember which monitor corresponds to which symbol. They will then disappear, and one of the symbols will appear on the large monitor. Simply interact with the monitor corresponding to that symbol, and then a new one will appear. Repeat until the game ends, and one of the Tesla Coils will have a white glow. Now repeat this with the computers at the rocket test site. Be weary, as if the rocket begins testing during the game and you abandon it, you will have to restart the process on both computers. With both coils charged, approach the Tesla Trap generator, and a button will now be glowing green, and you can interact with it. The rocket holding Dempsey's pod will now be blown up, and it will fly down to the courtyard.
  13. After returning to the map, a Panzer will spawn. Make sure you do not end the round, before you input the code. Head to the tesla trap, you can place the fuses you picked up. Then, go to the right side, and there should be a meter with an arrow pointing to the word destroy. Interact with it so that it is pointing to protect. Now approach a set of green monitors next to the clock tower and Wunderfizz, and four symbols should appear on the monitors. @anonymous @RadZakpak @NaBrZHunterpictures need to be added You must input the three symbol sequence that Groph entered by interacting with the monitors. If done correctly, you can return to the teleporter room, and the safe will now be open, with some items inside to pick up. If you input the wrong code or advance the round so the code is different, you must hunt down the wisps again on the next round and watch Groph input a new code.
  14. After upgrading a bow, a player will need to use the non-upgraded Wrath of the Ancients to shoot six electric coils above the teleporter. This is possible in one shot in the right position. Once shot correctly, they will glow orange, and after all have been shot, you will hear a roaring noise, and must now search for a set of wisps. An electrical wisp will spawn in one of eight locations, and must be shot with an upgraded bow before time runs out. These are the eight locations: 1. On the table in front of Quick Revive: 2. On the car between spawn and Double Tap: 3. In the room above Double Tap on top of a cabinet: 4. On a globe past Samantha's Room: 5. On a phone in the power room: 6. On a clock in the mission control laboratory, above the dragon head: 7. On some machinery in mission control on the lower floor: 8. On a clock going upstairs from the courtyard: Once one is shot, it will disappear, and the roar sound will be heard when the wisp respawns somewhere else. You will have to shoot the wisp four times without running out of time. If you do run out of time, you will need to wait until the next round. After the fourth wisp, you will hear a different noise, and the teleporter should now have a purple glow on its pad. Every player will now need to enter and teleport back in time. You will only be here for a limited amount of time, so in that time you will need to grab two items, and watch Dr. Groph input a code. The two items to grab are: 1. The fuses, which are on a set of boxes to your right as you leave the teleporter: 2. A blue cylinder, which is to your left as you leave the teleporter: Now approach Groph, who will be placing something inside a safe and he will type a three-symbol passcode. You should watch him put in the code, and be able to recall the code later. The code will be different every game. If you acquired everything you need, you can move on to the next step. If you missed something, you can wait until the next round and shoot the wisps once again.
  15. After turning on the power, the first step will be acquiring an upgraded bow. You only need one upgraded bow to begin the easter egg, however you will need one of the upgraded bows for each player in the game in a later step, so each player should begin upgrading one. What this means is in Solo, you will only need one bow. With two players, you will need two bows, and so on. Before you can upgrade a bow, you will need to acquire the original Wrath of the Ancients. To do this, you must feed six zombies each to three dragon heads around the map. One is near the mystery box spawn just past double tap. One is inside the main castle area where Speed Cola is located. One is in the undercroft next to the pyramid. After acquiring the Wrath of the Ancients, you craft any of the upgraded bows. There are four bows in total Lightning Bow Wolf Bow Void Bow Fire Bow Here are the steps for each: Lightning Bow Step 1: Shoot the weather vane above the Bastion with the bow. It will drop an arrow to pick up at the base. Step 2: You must light three pyres on fire with the bow. One is located near the bastion behind the clock tower: One is located just past the rocket test site and can be shot from the Bastion: One is visible from the rocket test site looking up the mountain: Step 3: Activate low gravity in the undercroft by standing still on four panels surrounding the pyramid. While in low-gravity, wallrun along the walls of the undercroft, passing over several glowing blue wind-like symbols until a progress bar appears in the top right of the screen and none of the symbols are glowing. Step 4: You will need to kill zombies near some sparking canisters, then electrify the arrow of your bow and shoot the same pyres you shot before. To electrify your arrow, hold back the arrow as if you are about to fire, then approach the canister and the arrow will be sparking. Then you can attempt to hit the pyres. If done successfully, the fires emitting from them will have lightning. One canister is inside the clock tower under the stairs. Use this one to shoot the pyre behind the tower. One canister is across from the buildable table that is near a Wundersphere. Use this one to shoot the pyre in the distance past the test site. One canister is inside the tunnel at the rocket test site, across from the teleporter. Use this to shoot the pyre up the mountain. Step 5: Return to the weather vane and interact where you first picked up the arrow. After it rises to the vane, it will drop as a fixed, glowing arrow. Pick it up. Step 6: Go to the undercroft and interact with the box surrounding the pyramid with a lightning symbol. You will receive a max ammo. Insert your bow into the box, you must kill zombies near the pyramid until the box is charged up. Once no more souls enter the box, you can collect your upgraded bow from the box Wolf Bow Step 1: You must interact with four paintings around the map in the correct order to reveal a wolf symbol of each one. One can be found in the hallway connecting Samantha's Room to the Armory, near a barrier. One can be found in the clock tower. One can be found in the room underneath the clock tower. One can be found in on the walkway in the main room of the castle, near the doorway that leads to a staircase down to the courtyard. The paintings are randomized each game, however they must be interacted with in the same order: The king on his throne with a wolf, a knight riding a horse, a castle engulfed in flames, and then the King struck by arrows. If done correctly, as you enter the undercroft from the laboratory area, the broken arrow will appear from the wall where there is a wolf symbol. Pick up this broken arrow. Step 2: Head to the rocket test site, and shoot a red flag up and to the left of the big door. If hit, it will drop a wolf skull which will come tumbling down and you can pick it up. Step 3: Go to the pyramid in the undercroft, and approach the box with a wolf symbol on it. To the right is a wolf skeleton missing its head. Place the skull on the skeleton, and a ghost wolf will spawn. You must follow him around the map, and he will eventually stop and paw at the ground. You must then kill zombies near that location until the wolf digs and the spot is glowing. Pick up the bone from the hole, and the wolf will start moving again. Keep repeating this process until the wolf ends up in the undercroft and starts pawing at the wall. Step 4: Activate low gravity in the undercroft by standing still on four panels surrounding the pyramid. While in low-gravity, wallrun along the walls of the undercroft, and while still wallrunning, shoot a set of wolf symbols above where the wolf is pawing the wall. A platform should then form underneath for you to stand on. Interact with the tomb on that platform, and a skeleton will form, and hand you the fixed arrow. Step 5: Go to the undercroft and interact with the box surrounding the pyramid with the wolf symbol. You will receive a max ammo, and you must kill zombies near the pyramid until the box is charged up. Once no more souls enter the box, you can insert your bow into the box, and it will come back out as the Wolf Bow. Void Bow Step 1: Go to the area with Double Tap, next to the gumball machine, and look up. You should see some purple symbols on the wall above the gatehouse with the bow. It will then drop a broken arrow for you to pick up. Step 2: In the room below the clock tower, a purple square should appear on the ground. Kill a zombie with a melee kill over this spot and it should break open. Interact with an urn inside the hole, and it will rise into the air. Step 3: You must collect six Keeper skulls around the map that will disappear when interacted with. One is in the tunnel leading to Mule Kick: One is on a windowsill up the stairs from the courtyard: One is in Samantha's Room in a toy chest to the left of her bed: One is to the right of the broken wall leading to Double Tap: One is to the right of the teleporter in a sink: One is at the rocket test site on the back of a truck: Step 4: Got to the room underneath the clock tower and make crawlers, it will be around 6 required Once completed, shoot the urn, you need to remember the words. Step 5: Head to the undercroft and kill zombies, some of them will drop purple symbols. When you pick up the symbols they drop, that symbol will glow on the ground around the urn. It is okay if you collect symbols you do not need, but once the three symbols you noted earlier are lit up, you can shoot all three with your bow to finish the step. Interact with a flame that comes from the hole, and after a moment you will get a fixed arrow. Step 6: Find the three knights matching the words spoken in step 4 Step 8: Remember the symbols shown to you when you found the correct knights and head back to the room underneath the clock tower and shoot the corresponding symbols. They will then appear in the air and the voice will confirm, that is his name. Now collect the arrow Step 7: Go to the undercroft and interact with the box surrounding the pyramid with a purple symbol. You will receive a max ammo, and you must kill zombies near the pyramid until the box is charged up. Once no more souls enter the box, you can insert your bow into the box, and it will come back out as the Void Bow. Fire Bow Step 1: Inside the clock tower and up the stairs, shoot out the wall with a red symbol using the bow to get a broken arrow. Step 2: Go to the rocket test site, and wait for the rocket to begin testing. Wait near the door with your arrow pulled back, and as soon as it opens, you must shoot a rock up and to the right which has a glowing red spot. If done quickly enough, a fireball will shoot up to the castle. Step 3: You must shoot three red glowing rings while in mid-air using the Wundersphere. This is one of the hardest bows to get for this step alone. If shot correctly, the rings will have fire around them. One is found between spawn and double tap, and can be shot on the Wundersphere from the rocket test site to spawn. One is found on the bastion in front of one of the Wunderspheres, and can be shot using the Wundersphere from the courtyard. One is found next to the landing pad at the clock tower, and can be shot from the Wundersphere near the buildable table. Step 4: While standing on each ring, kill zombies to collect their souls until no more can be collected. Step 5: Head to the top of the clock tower and interact with the cogs where you collected your arrow. A symbol should appear you will have to light a fireplace corresponding to that symbol. There are three fireplaces Church Room upstairs at first dragon Near samanthas room You need to light the fire place. At the circle closest to the fireplace a little volcano appears and this is how you know you are in the right circle. Stand inside the circle and shoot strategically to position for your second shot. Your last shot needs to go into the fireplace. From the starting point, you must fire your arrow into the air, and wherever it lands, some glowing red rocks will appear. Standing in those rocks, you can fire again for another set of rocks. Eventually, you will want to end up in front of the fireplace so you can shoot directly into it. You must do this in three shots or less, however, so it is key your arrow lands in a good place each time. If the ring near Double Tap is glowing, you will need to light the fireplace near Samantha's Room. The easiest way to do this is to stand on the ring, shoot the snow underneath the bridge, then shoot up towards the entrance to samantha's room, and then shoot into the fireplace. If the ring by the Death Ray and Wundersphere is glowing, you must shoot your arrow into the fireplace near the laboratory under the dragon head. The easiest way to do this is to aim and shoot to where your arrow lands in the courtyard near the entrance to the castle, then shoot into the laboratory, somewhere where you can see the fireplace, and then shoot the fireplace. If the ring is by the clock tower is glowing, you will need to light the fireplace on the other side of the castle, in the room where the Wunderfizz machine is. The easiest way to do this is to aim high and try to land in the area under the bridge, then aim up to the walkway that is able to see the fireplace, and then shoot the fireplace. Once done, you can interact with the fireplace to acquire your fixed arrow. Step 6: You now need to interact with the fireball in the courtyard at where the weather vane is You'll now receive your arrow Step 7: Go to the undercroft and interact with the box surrounding the pyramid with a red symbol. You will receive a max ammo, and you must kill zombies near the pyramid until the box is charged up. Once no more souls enter the box, you can insert your bow into the box, and it will come back out as the Fire Bow.
  16. I'd like to bring this thread back to life because I believe the answer to the most mysterious eye color, red, has been answered. In the wake of Tag der Toten and the end of the storyline, seeds have been left to explain this mystery which I would like to explain. In Tag der Toten we are introduced to Apothican Blood: A collection of smaller organisms that form a hive-mind and make up the blood of the massive Apothicons, like the one we see in Revelations. It just so happens that the zombies in Tag der Toten have red eyes. Given Alpha Omega's confirmation that an Aetherial entity close enough can take control of the undead, it is reasonable to assume the red eyes are a result of the Apothican Blood, which can form coherent thoughts and actively fights against Victis as they try to harness it. Don't believe there is a connection yet? I'd like to remind you of the first time we saw red eyes in Zombies, the first time that I neglected to mention in this very thread. That's right, Russian Cosmonaut Zombie Monkeys are the first enemy to have red eyes. What is the significance? Allow Dr. Yena and Dr. Gersh to explain: Ah, so this is the origin of the space monkeys in Ascension. Seems like a strange thing to answer, until you make the connection between the Blood and the Monkeys, and realize this may be more an explanation for the red eyes. Let's review the maps that contain red-eyed zombies and discuss the Blood's connection. Mob of the Dead/Blood of the Dead The presence of red-eyed zombies in Alcatraz might seem to contradict this theory immediately, with the lack of direct appearances by anything Apothicon. However a portion of the Blood of the Dead easter egg may have been an early appearance of the Apothican Blood being used for another purpose: These orb/portal looking things are spawned by an arc of red light emanating from the lighthouse, and at each location interacting with the orb recounts the story of inmates of the prison, their souls trapped here to replay these moments over and over again, much like the Mobsters and Primis. Here's a picture of Apothican Blood: Now we know that the Warden was a hardcore Apothicon fanatic, going so far as to commit suicide to do their bidding. With blood as a running theme, he may have acquired Apothican Blood to use on himself and the mobsters to keep them coming back over and over in their endless cycle. Interestingly... their blood is later used on Primis. Interesting, but let's move on to the next map. Gorod Krovi Barring the name of the map itself, which translates to City of Blood, what evidence is there for the Apothicon Blood appearing here? I'm glad you asked. These "ancient beasts" being referred to may not actually be other dragons, but instead the Apothicon beasts, whose blood we are discussing today. Quite similar to the space monkeys, the dragons are extremely aggressive and hostile. The only way to control them is through the use of frequencies and mechanical collars. Another thing that may seem insignificant on the surface but further supports this theory: The upgrade quest for the Dragon Shield. It involves getting kills, then blasting several Apothicon symbols around the map, and then... bathing the shield in the blood of a dead dragon, giving the shield red eyes and a red blast... yuuuup: So I believe the presence of red eyed zombies is either a result of the presence of these dragons, or, as mentioned in radios on the map, the people of Stalingrad were intentionally infected, but rather than being infected with 115, they were infected by the Blood. And lastly, Revelations This one is obvious, with our first appearance of the source of the blood: The Elder Gods: The only hole I can see to poke in this theory, as pointed out by @KronoriumExcerptB, Shadows of Evil has a heavy Apothicon presence and yet the eyes are orange there. While that massive beast in the sky is not an Elder God and we don't quite know what it is, why wouldn't it have the same type of Blood?
  17. Now you will have to locate three items around the map and shoot them with any weapon. Every time you shoot one Maxis will confirm this by saying something. The locations of the items are: Inside a compartment under Teleporter A. On a balcony just outside above the power. Inside a vat in front of Teleporter B. After all three have been shot, you can go to the furnace in the garage, and grab the Annihilator Specialist Weapon. You will get progress towards A Better Tomorrow.
  18. To do this step, the player must obtain a Pack-a-Punched weapon. Now, you have to go the alleyway in the direction of the animal labs, the area to the right of the Pack-a-Punch machine but before entering the building. Look outside the barrier: Far in the distance you will notice a control panel on a pillar. Shoot it with your upgraded weapon or throw a grenade at it. If done correctly, Maxis will speak to you Several items around the pillar will be emit a green glow and start to fly up in the sky and disappear.
  19. Activating the Pack-a-Punch machine is a relatively easy step. First, one has to open enough doors to gain access to all three Matter Transference Devices (M.T.D.'s), also known as Teleporters. The following map perfectly indicates the three locations: Now, you have to link them to the mainframe in the spawn room. To do this, step inside an MTD and press your activation button, which will be followed by a mechanical noise and the appearance of a clock on your screen counting down from 30 seconds. Within this time period, someone must go to the mainframe and activate the receiving pad in front of the Pack-a-Punch machine. Do this with each MTD until the door is fully open. This will permanently allow the players access to the Pack-a-Punch machine.
  20. For the final step, three players must be located at or near a train station, and the last should be in the center of the map where three Keepers are surrounding a Giant Gateworm. Someone at one of the train stations must go into human form and have a goblet ready to transform back into Beast Mode. They must call the train to their location, and immediately return to Beast Mode. The players near the three train stations must shock a box on the top corners of the stations where you would enter the train. They must keep shocking the box so that the rails stay glowing blue. Quickly, before the train passes through the middle of the map, the central player must zap all three Keepers. If done correctly, as the train passes by the Gateworm will be killed and the final cutscene can begin. You will receive progress towards A Better Tomorrow and a Calling Card.
  21. The entire map will be filled with purple glyphs and Margwas. If you touch the purple glyphs you will become damaged. Additionally, your screen will turn red every thirty seconds. When this happens, you must run to one of the white orbs floating around the map to prevent yourself from going down. You may notice the stone goblets around the map will have red flames instead of blue flames, preventing you from becoming the beast. To recharge a stone basin you must kill at least one Margwa. All four players will need to be in Beast Mode, three of them in Canals, Footlight, and Waterfront, with the final player being in the center of the map near the crane. Beast mode will last for an infinite amount of time. However, if you revert to human form, let the Margwas hit you too many times, or allow the screen to turn red for long enough without touching a green orb, you will need to kill another Margwa to recharge another stone basin. So always be ready to grab a white orb as you perform the next step.
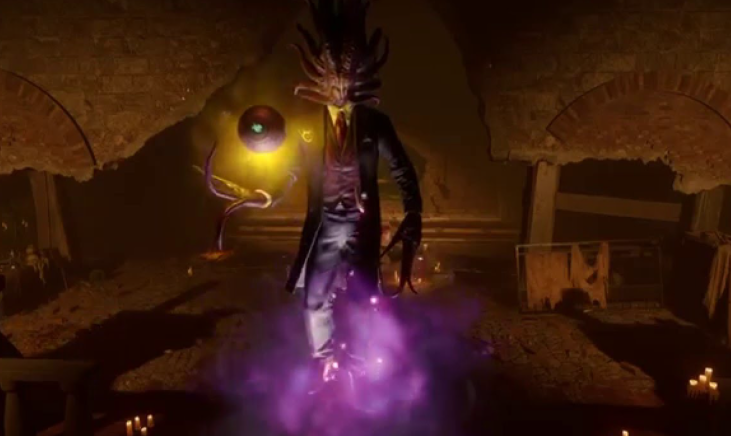
  22. All four players should go into the Pack-a-Punch room, and four Keepers should be near the Gateworm pedestals. Interact with each of them, and then the boss fight will begin. The Shadowman will appear, and when he has a circular aura around him he cannot be damaged. But when it disappears, all players should begin shooting him with their automatic weapons, and continue to do so as he teleports around the room. With enough damage in a short amount of time, he will teleport closer and closer to the ritual altar. Once he is above it, a player will need to interact with the altar to pull the Shadowman into the Summoning Key, defeating him. If you fail to damage him enough in a short amount of time, interact with each Keeper to get rid of his aura and try again.
  23. Hey everyone, it's been a while... again. Truthfully I kind of lost my mojo with this story for a while, and it took a long time for me to get back into it. But, I have good news: 1. I have gone through all 23 chapters and edited them for a combination of clarity, consistency, and continuity. Gone are many grammatical errors and awkward sentence structures. I also made sure that things previously unclear in my writing should make a little more sense, and there shouldn't be anymore continuity errors with certain characters. For example, recently I've gone into how Schuster studied Chemistry heavily, and it is his passion, yet I forgot that in early chapters I say Schuster doesn't know much about Chemistry, and Groph does. Now Schuster loves Chemistry the whole way through. 2. I am also introducing a new concept to the structure of the book: Story Scraps. These Scraps will be short messages, letters, or diary entries placed between chapters to add some depth to the world or shine a spotlight on minor characters without taking up more space in a normal chapter. Currently, I have added only three, and one is simply a Schuster diary entry that used to be a part of the main chapter, and two are data servant entries. I have several others planned, some even between chapters already written, so look forward to those. 3. I have had issues with updating the storybook through this site, and while that is currently being worked on, I have made a google doc for the storybook with handy navigation tools, and you will have the ability to comment anywhere on the page to ask me to add more clarity or fix errors. Here is a link to the doc. Don't worry, this is not the version I will be working on, so go crazy adding what you want! Go here for the version with all the updates for now. 4. Chapter 24 is being written right now! I will add it to the doc once it is ready.
  24. Hello everyone, and welcome back to the Order of Forgotten Mysteries! Today we will be discussing a topic that has been around for years with no definitive answer in sight, and even with the release of Alpha Omega the question is raised again: What do the Zombies' eyes signify? This seemed like a simple question with a simple answer: It's about who's in control. However, this assertion has been challenged a couple of times in the past, and now this mystery has still yet to be solved. Let's review the known eye colors and the maps they appear in. Yellow/Orange Maps: Nacht, Verruckt, Shi No Numa, Der Riese, Kino, "Five", Ascension, Call of the Dead, Shangri-La, Moon (Pre-egg), Nuketown (Before round 30), Buried (Post Maxis End Game), Origins, Shadows of Evil, The Giant, Der Eisendrache, Zetsubou No Shima, and Classified This color is typically associated with Samantha Maxis. It would be easy to assume that while Samantha's soul is inside of the MPD, the eyes are orange as they switch to blue immediately upon Richtofen switching his soul into the MPD. This, however, is a tricky assumption to make, as there are numerous examples of times when eyes are orange where Samantha CANNOT be in the MPD. This includes Nacht and Verruckt, which take place before she enters the MPD on the timeline, Origins and Shadows of Evil, which take place in Dimension 63, Shadows of Evil not involving Samantha at all, and TG and DE which take place in fractures where the MPD is never occupied by Samantha, but it empty when it is teleported to the castle. It is not fair, however, to say that the orange eyes have no association with Samantha. In every map with the orange eyes, the announcer is the demonic version of Samantha. One recent quote that is intriguing regarding these eyes is this one from Classified: As a member of Group 935 for years, Schuster must have seen a ton of zombies throughout testing, and yet, why is he so intrigued by the yellow in the zombies' eyes during his time at Broken Arrow? The best explanation for this is that they match the eyes of the zombies that Samantha unleashed at Griffin Station after Maxis' death. Indeed, the following audio reels from this one explore Schuster warning the others in Broken Arrow about Samantha. He is aware of the eyes' connection to her, and that she is still around. One last interesting thing to note, in the Maxis end game for Buried, when Richtofen's soul is removed from the MPD, the eyes of the zombies turn back to orange, and yet, there is no announcer on the map. It is silent when powerups are picked up. Blue Maps: Moon (Post Egg), TranZit (And all of Green Run), Nuketown (After Round 30), Die Rise, Buried This color is most certainly associated with Edward Richtofen. Immediately upon entering the MPD, all zombie eyes turn blue, and upon Maxis winning in Buried they lose their blue. Eddie says in the Origins end cutscene while playing with Sam that he believes that zombie eyes should be blue. In the Maxis end game, Maxis will place Edward's soul into a zombie body which will have, of course, blue eyes. In the Richtofen end game, Edward enter's Stuhlinger's body, and he gains blue glowing eyes whenever Richtofen speaks. It is always associated with Richtofen as the demonic announcer. Red Maps: Mob of the Dead, Gorod Krovi, Revelations, Blood of the Dead With their first appearance in Mob of the Dead, it seemed that the Warden, or whatever Ancient Evil was in control was responsible for the red eyes, as the announcer was completely different. This, however, is thrown out the window with Gorod Krovi. There is seemingly no explanation for their role in the map and why Samantha is the announcer. It has been speculated that the eyes are associated with the Shadowman, Dr. Monty, or some other entity that has a role in these particular maps. While Blood of the Dead confirms that the Shadowman has a role in influencing the Warden of Alcatraz, and his control in Revelations would make sense, this does not explain how he would control them in Gorod Krovi as he is still trapped in the Summoning Key by that point. Dr. Monty on the other hand would make sense in Gorod and Revelations as in Gorod he made his first appearance calling out to Primis, and we now know he has a hand in perpetuating the cycle, which Gorod is a key part of. Light Purple Maps: Origins (Templar Zombies) While I was initially skeptical about these eyes, believing that lighting made them appear different, they are 100% different from the normal orange-eyed zombies on the map. These templar zombies only spawn under the dig site and inside the Crazy Place. They seem to work alongside the regular orange-eyed zombies in attacking the player, and are the first attackers in the outbreak. Notably many of the templars bear a black sun symbol on their chest: This is the very same symbol seen on the robes of the Order of the Keepers: Could these templars hold the spirits of long-dead Keepers from the Great War? Or were they petitioned by the Keepers to, even in death, defend the dig site so that the 115 could never be utilized by the Apothicons again? White Maps: Alpha Omega While it seemed Treyarch had forgotten the debates regarding eye color, they have thrown us another curve-ball in giving the zombies white eyes in Alpha Omega. This seems to be signified by Avogadro being inside the APD at Camp Edward. This is all fine and dandy, until you realize that Samantha is still inside the MPD. The Samantha announcer from Classified remains the same, and yet the eyes have changed. Could this be an area-specific control, where Avogadro can only control them within the limits of Camp Edward? This seems unlikely, as in the original timeline, according to Alpha Omega's radios, the Avogadro is still within the APD as of 2025, and in Nuketown Zombies the eyes are orange. It is possible, however, that after the explosion caused by drilling, the APD and Avogadro inside were destroyed, and thus Samantha regained control. Zombie eyes, seem to correlate with electricity in a lot of cases. In TranZit when an EMP is thrown near a zombie, they will lose their connection with the Aether, becoming harmless, and losing all color in their eyes. The Galvaknuckles make short work of them compared to, say, a knife, or a gun. With that in mind, it may be obvious to see how using the mind-control abilities of the APD and his own electrical powers, the Avogadro could take control of zombies in the vicinity. Green Zombies' eyes turn green when they are friendly. This can be caused by the Turned/Brain Rot ammo types or the Ctrl-Z Elixir. They are simply short-lived zombies that swipe at other zombies before bleeding out. Their story significance is most likely little to none. If there is any that I missed, let me know. What do you make of this situation? Was this thread eye-opening?
  25. So with the release of Alpha Omega, there are of course going to be new additions to the story, and I knew that at least some of the changes would conflict with the story I planned on telling. Thankfully, it doesn't change a whole lot that is already written. Richtofen's story remains the same, but Alpha Omega did a lot with Cornellius Pernell and Peter McCain, two characters who previously had little to no known backstory so I saw fit to fill that in. I had a plan for where the two characters would eventually go narratively, but some of that is now changed. For now, I'm going to designate the current Peter chapters as non-canon until I can find a clear path I want to take with them and the ones I had planned. I was afraid with his revival by Pernell and immediate joining of Broken Arrow that Peter would turn out to be just a follower and not someone who would do anything for the greater good. But that quickly changed as he reported his old friend to the DoD as he was clearly a danger to those around him. Anyway, initially my plan with Peter was going on a few missions in Europe before ultimately preparing to infiltrate Group 935. His mission was to learn what he could about the Wunderwaffe and progress on the undead army. After being transferred to the Verruckt facility, he would discover that Group 935 is barely in control and call for Pernell to send the extraction team. Only then does Pernell reveal that his mission is actually to recover an Elemental Shard that scientists as the asylum are using to try and control the dead. Peter believes it should be destroyed, but is ordered by Pernell and his superiors that that is the priority over anything else. Peter is subsequently captured, however the outbreak worsens and Peter breaks free, losing his arm in the escape. He commandeers a plane and receives the last transmission from Pernell telling him to rendezvous at the Rising Sun Facility. As Peter prepares to jump with the shard and the experimental Mk 3 weaponry, he decides to the shard is better off in no one's hands, leaving it on the plane as he parachutes down. Unfortunately the chute malfunctions and he dies having destroyed the shard. In Book 5, Peter awakens in a city surrounded by fire. There are winged beasts flying through the sky, and he is on the ground, his parachute having been activated. He comes to realize he is in Stalingrad, and is soon chased inside a building by the undead. They are too strong and break inside, not before he sees a bright flash of light and feels his body becoming weightless. He awakens again in what looks like a castle made of stone. The open sky is exposed, but there are no clouds. Only a bright, blue orb in the sky surrounded by stars. He hears voices, yelling, shooting, explosions. He grabs his weapon, exploring the ruins, before discovering it is connected in some way to a building made of wood. He steps inside, revealing a massive auditorium, a theater. As he gazes upon the projection screen, memories flood into his mind: There's a pain around his neck, a gasping for air. He sees himself hanging from a rope, his arm missing. Four men are looking at him as he swings limply. Again he feels weightless, and there is a flash. All he sees is utter blackness, before finally, he falls to a stone street. There's Jazz music in his ears, and there are hundreds of people walking along the sidewalks around him. The air is cool and the night sky illuminated by the street lights. The people's faces, however, are blank. No features whatsoever. None of them speak. Just walking. Peter follows the source of the music and finds himself in a club. The people within this club have faces, all smiling and chatting away as they drink. There is a lone couple dancing in the center of the club, slowly. An older, bald man with a white beard, and a young brunette in a dress. Peter, still wearing his marine uniform covered in dirt and soot steps up to the couple, who stare at him, confused. The room fades as the couple approach Peter. They reveal themselves as Dr. Maxis and Sophia. Peter says he was told to find Dr. Maxis, and asks him where they are. He reveals that they are inside the Summoning Key. Inevitably, The Great War, now the Final War begins to defeat Doctor Monty with Primis and Ultimis leading the charge. They would enlist the help of former associates across dimensions, including SOPHIA, Maxis, and Peter from within the Key. I won't go into all that since it doesn't seem to be going that way, but Peter would reunite with Pernell... who I didn't think would turn out to be a bad guy, but hey... So yeah, anyway, I'll probably focus on finishing Richtofen and Maxis' journeys, and then worry about Peter, if at all. I might just delegate Peter to side material for the sake of length and consistency.
×
×
  • Create New...

Important Information

By using this site, you agree to our Terms of Use, Privacy Policy, Code of Conduct, We have placed cookies on your device to help make this website better. You can adjust your cookie settings, otherwise we'll assume you're okay to continue. .