RadZakpak
-
Posts
1,328 -
Joined
-
Last visited
-
Days Won
225
Content Type
Profiles
News & Announcements
Zombies Library
Easter Egg Guides
Intel
Forums
Everything posted by RadZakpak
-
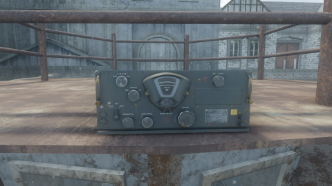
 Process Perfected (This radio does not sound like Ludvig Maxis, however, Revelations and the timeline confirm it is him) Another Setback (This radio does not sound like Ludvig Maxis, however, Revelations and the timeline confirm it is him) Monty's Radio (This radio appears in the Black Ops 3 version of Kino der Toten)
 -
 Pernell's Transmission Find Dr. Richtofen Just The Beginning (Audio comes from the Verruckt “Just the Beginning” Trailer) When Are We? (This radio first appears in the Black Ops version of Shi No Numa) Monty's Radio (This radio first appears in the Black Ops 3 version of Shi No Numa)
 -
 Monty's Radio (This radio appears in the Black Ops 3 version of Nacht der Untoten)
 -

The Armory: Extinction Teeth Upgrade Master List
RadZakpak replied to GRILL's topic in Extinction Mode
Possibly... I've never run into that problem and I have never played casual, so that may be it.- 64 replies
-
- 1
-

-
- extinction
- teeth upgrades
- (and 2 more)
-
The Armory: Extinction Teeth Upgrade Master List
RadZakpak replied to GRILL's topic in Extinction Mode
According to the CoD wiki, you don't actually get teeth for not going down. Here is the list of all the things that give teeth: It's also important to note you only get extra teeth with up to 3 relics. Any more than that, and you are just challenging yourself for no extra reward. I'm by no means an Extinction expert, but the way I've just earned teeth was playing PoC public matches with three of the easiest relics on on regular difficulty. It's more fun that way IMO than existing boosting methods, and I would end up with around ~10 teeth per match depending on the competency of your teammates with challenges.- 64 replies
-
- 2
-

-
-
- extinction
- teeth upgrades
- (and 2 more)
-
A Very Zombie Christmas: The O4 Sing the Classics
RadZakpak replied to GRILL's topic in General Zombies Discussion
Richtofen is surprisingly good, but Nikolai is great with improvised lyrics: "Siiiiilent night, ehhhhh not quite" -
A Very Zombie Christmas: The O4 Sing the Classics
RadZakpak replied to GRILL's topic in General Zombies Discussion
These songs always bring back the holiday spirit. I urge anyone who has not listened to give them a try. -
 Nikolai in his mech suit will have a variety of attacks to damage you. He can shoot you with his guns at range, stun you with rockets, leap across the arena and stomp on you, and he can launch RAPS which will roll towards you and explode. Meanwhile, zombies and Manglers will continue to spawn and swarm you. Stick to the edges of the arena to avoid his ranged attacks, and be ready to strike when the time is right. There are four weak spots on the mech: Two of them are glowing orange lights always present on the front of the mech, and two of them are glowing orange cylinders that pop up on his shoulders after some of his attacks. Shoot these spots until they are no longer glowing to damage him. After all four have been destroyed, a more obvious weak spot will appear under the cockpit window for you to damage. Defeating Nikolai starts the end cutscene and completes Love and War.
 -
 When you are ready, head to Dragon Command and all players should stand on the grate where Sophia was. You will be dropped into the sewer and out towards the boss arena. A dragon will spawn in and occasionally light up the arena. You will need to hold out your shield to survive in this fire without damage. Eventually the dragon will perch on top of a building with an orange glow on its wings or chest. You must shoot this glow to damage it. If done enough, as it flies Nikolai will damage it further with his mech to open another weak spot. Avoid dying by zombies and Manglers during this fight, and the dragon will eventually die. A short cutscene will start before you must face Nikolai.
 -
 A Groph Module will spawn outside the map somewhere near a dragon location. Zombies will not spawn inside the map, but they will spawn outside and attack the Module. Defend it by shooting down below with your weapons and Dragon Strikes. Undead Man Walking can help in defending the module. Do not worry about watching your back. Once completed and the pod is opened, release the Whelp from the Gauntlet of Siegfried. It will fly towards the pod and retrieve cargo for you to pick up. Take the cargo and give it to Sophia to complete the challenge.
 -
 This Challenge always comes last after the five others. Under the trophies a drawer will pop out with a keycard. Pick up this keycard and all players should go to the house. On the ground floor there should be a red computer screen near the toilet. Placing the keycard here will start a lockdown. An infinite number of Manglers will begin to spawn in during the lockdown, and you must survive while the computer downloads. You should see its progress on your screen. After completing the lockdown, pick up the keycard from the computer and return it to Sophia. She will give you a power core and leave the map. Pick up the power core and return to spawn. Using the Gauntlet of Siegfried, release the Whelp and it will bring the power core to Nikolai. You will be able to begin the boss fight now.
 -
 Head to the spawn room and stand towards the left-hand side past the graves. A friendly Valkyrie drone with a green light should spawn in. Standing near it will cause it to move forward towards Dragon Command. You need to stay near it until it reaches the end point, avoiding death due to the infinite zombies. Undead Man Walking makes the step much easier as well. It is also very easy to accidentally destroy the drone, so be careful when firing. Once it reaches Dragon Command, the challenge is done.
 -
 Search the map for a friendly Mangler that is roaming aimlessly. Getting close to it will cause it to follow you. Lead it towards Dragon Command in the corner to the right of the trophies onto a pad. It should get pulled up into the ceiling to complete the Challenge. Stepping too far away from the Mangler on the way will cause it to leave you, and it will occasionally shoot you with its arm cannon. Zombies are infinitely spawning and should be incredibly fast by this point, so this is a great time to use Undead Man Walking if you have it. Also, be careful not to accidentally kill the Mangler.
 -
 There are six bombs on the map that must be defused within a short amount of time in order or they will explode and kill anyone nearby. Make sure you know where every bomb on the map is and have someone nearby ready to activate them before starting a new challenge until this Challenge is done. There is a bomb in each area of the map planted on the wall. As soon as the Challenge is chosen, the map on the screen will flash each area in the order that you must defuse the bombs. It might be safe to record this with your phone in case you forget, but you need to tell your team the order immediately and communication is key to ensure the bombs are deactivated in the correct order. One wrong move and the game could potentially end. You will have less time the more players you have in the game, so with a full team it is crucial that every player is placed near one or two bombs before starting. The bomb locations are: [pics of all six locations]
 -
 A yellow wisp will be floating around the map through different walls. You will be able to hear Gersh talking when you are near. As soon as you see the wisp, start damaging it with Pack-a-Punched weapons and Gersh will start screaming. He will eventually teleport to another area of the map where you must continue shooting him until he eventually ends up in Dragon Command and the Challenge will end. [pic of Gersh}
 -
 On the opposite side of the room from Sophia is a large screen. Below the screen you can place down the trophies you have collected. The button in the middle should now be green, and interacting with it should start a new random, uncompleted challenge. During each challenge, zombies will spawn infinitely. If you fail a challenge, you must wait until the next round and go back to the button to activate your challenge again. You will need to complete all six challenges to head to the boss fight. NOTE BEFORE STARTING A CHALLENGE: The Bomb Challenge will present to you a sequence of locations on the map that you must note the order of, so read through that challenge description first. You should have a camera ready or be able to note the order quickly as failing this challenge will instantly kill any players in the game even remotely near the bombs around the map, which can potentially end the entire run. You can fail it by running out of time or deactivating bombs in a wrong order. When initiating a new Challenge, lights will circulate between the trophies before settling on one. Based on the trophy and Sophia's instructions you can figure out which Challenge must be completed. The Challenges based on trophies from left to right are: The Gersh Challenge The Bomb Challenge The Mangler Challenge The Valkyrie Challenge The Group 935 Challenge (This Challenge always comes last) The Groph Module Challenge
 -
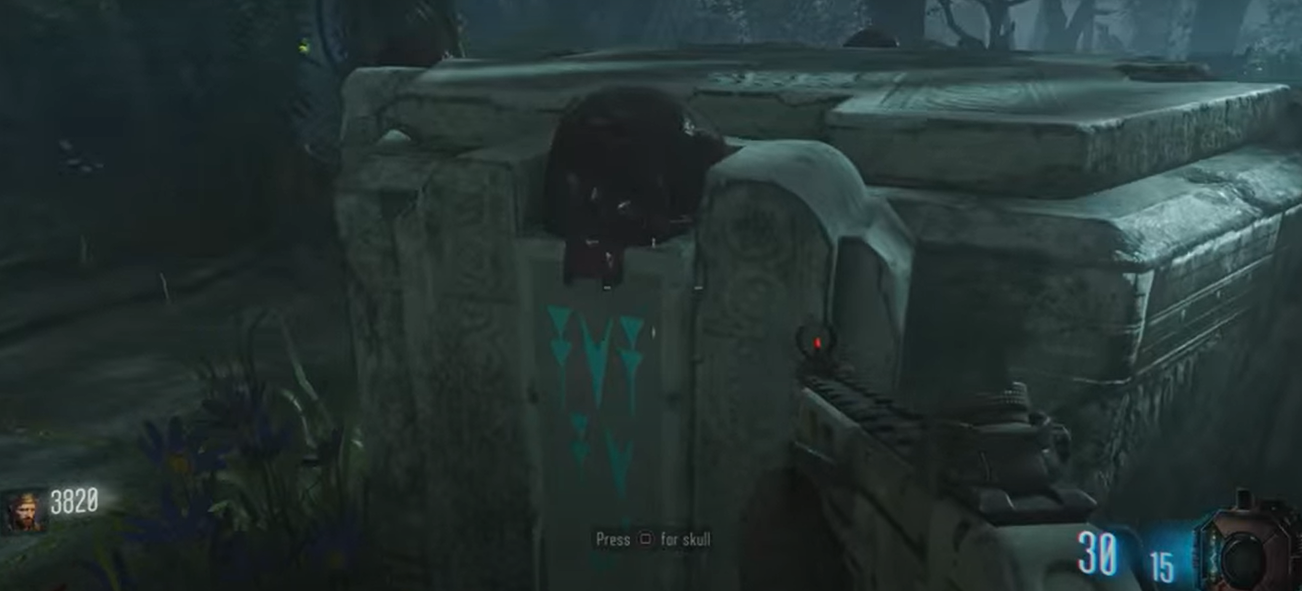
 Go to the room under the house where you incubated the egg, and notice a generator covered by a green tarp to the right of the incubation machine. Wait for a Valkyrie Drone to spawn, and kill it near the generator so that it explodes nearby. The generator will now turn on for a limited time. If you fail to acquire the cylinder in time, go back to the generator and interact with it to restart. [generator] Around the map are six valves; one of them has a green light above, and one of them has a pink cylinder floating around inside the valve. Note these locations, and input them into this website. It will give you a list of numbers to change the valves to around the map. If you've done this correctly, you can return to where you saw the cylinder, and it will be available for you to pick up. Here is a map showing the locations of these valves on the map: http://www.kronorium.com/img/locations.png Go to Dragon Command and go up to Sophia. Interact with her and wait for her to finish speaking. You can then place the cylinder into the machine. Letters should now show up vertically on the machine, and you must type in a password by shooting the letters to change them. The password is KRONOS. With the password ready, interact with Sophia again.
 -
 There are six trophies around the map acquired through various means that you will need to advance the quest. Outside of Dragon Command is a tank and above it on a wall there is a mural of Russian soldiers. Shoot the trophy out of the hand of the one on the right, and it will drop down for you to pick up. At the Tank Factory next to Double Tap is a window seemingly held open by nothing. Blast it with the Guard of Fafnir and the trophy should pop up. After going to the house with Pack-a-Punch, drop into the sewer and as you are being sent back to the spawn room, look up towards the top of the sewer. There should be a red light and switch that you must shoot as you pass under it. If it turns green, you can head back to the house again, and on the ground floor there should be a toilet now clogged with the trophy sitting in it. In the Supply Depot, activate the Laser Trap for 1500 points. On the floor where the laser impacts, you should now be able to acquire the trophy. Drop down from Speed Cola near the Supply Depot. Near the wall is a puddle of water. Aim the Dragon Strike on this spot to cause the trophy to spawn. After acquiring the Gauntlet of Siegfried, head to the safe next to the shield build table. Release the whelp from the Gauntlet, and then punch the safe open. The trophy is inside.
 -
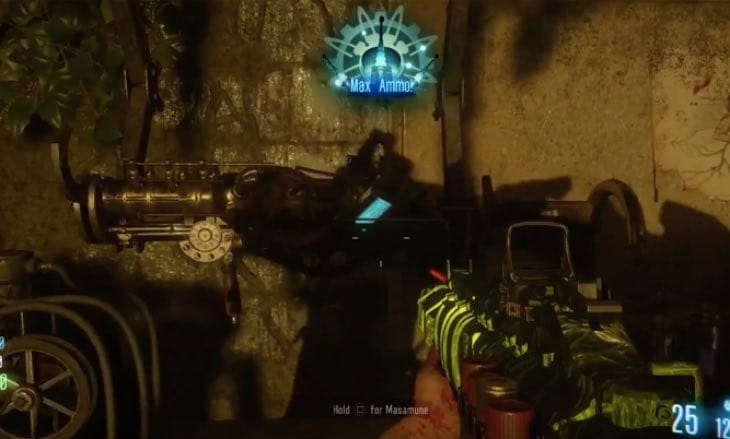
 You may now enter the elevator, and interacting with the panel inside will take you to the lower level where the boss fight is. By this point you should be prepared with good weapons and perks, shields, a gas mask, and someone with the Masamune. Using the Masamune, shoot some orange spores out of your path to get into the room. To start the fight, shoot one of the four arms that has a glowing orange spore with the Masamune. Many Thrashers and spiders will spawn. Start running around, killing as many as you can, avoiding the arms as they slam to the ground. Occasionally after killing enough Thrashers a max ammo will spawn in the middle of the room. Once one of the arms of the boss has a glowing orange spot, shoot it with the Masamune to damage Takeo. Repeat this two more times and the fight will be over. The trickiest part is simply surviving long enough until the orange spores are revealed. The cutscene should then play and you will have completed Seeds of Doubt.
 -
 You must collect three cogs to repair the elevator to the boss fight: 1. Use the Anywhere But Here! Gobblegum at any point after you mesmerized the poster, and you will be teleported into an Egg Hatching Room, and a cog will be on the floor to collect. You can then drop down to one of the laboratories to leave. 2. Electrify your shield the same way you did when upgrading the KT-4, and approach the zipline at the laboratory. Pay attention to a small dock below the zipline. On that dock is the cog, and you must take the zipline, and drop at the precise time onto the dock. In Solo, you should electrify the panel, then take the zipline, and knife while you are over the dock. In Co-Op, one player should take the zipline, and the other should electrify the panel while the other is over the dock. Be very careful here as you can drop into the water and die. You can do this from either side of the zipline. Once you are on the dock, collect the cog. 3. Plant seeds anywhere on the map, and water them with Blue Water, then shoot them with the KT-4/Masamune. Do this three times, and there is a chance that it will grow into a plant you can open and reveal an AA Shell. Pick up the AA Shell, and approach an AA gun to the right as you enter the bunker, where the KN-44 wallbuy is. Over time, a cargo plane will repeatedly fly over the map and in the path of the AA Gun. Simply interact with the AA Gun to place the shell inside, and then wait for the plane to be directly in its line of sight. Once it is, interact with the gun to fire and destroy the plane. If you destroy it, a cog will fly to one of three locations on the map and will be smoking. It can be on the right path to the Blue Water, near the bunker entrance, or near the Green Water. With all three cogs collected, go to the entrance to the bunker, and upon entering and to the left is an elevator close off. Use the Skull of Nan Sapwe to mesmerize the wall to the left of the elevator, to reveal an area where you can place the cogs into the machine.
 -
 First, acquire the KT-4 by collecting three parts: 1. A vial, which spawns on a glowing zombie. Once killed, the vial will drop to be picked up. 2. A sample of Spider Venom, which can be obtained at Lab A. Approach the Panel adjacent to the cage and activate it - causing the cage to lower. Then, lure a spider into the cage, by standing near it. Return to the panel and activate it, upon which the spider will be killed and the venom will be produced. 3. A special plant, obtained in the underwater section past Mule Kick. Continue down through the watery cavern until reaching the bottom, where the plant can be found. (Note, it is recommended the player shoot the spore to the left of the plant in order to replenish their oxygen) With these three parts, locate the table in the room just before Mule Kick which has the KT-4 suspended on it, and add the three items, crafting the KT-4. If you lose the KT-4, it can be reacquired from the box. To upgrade the KT-4, you need to acquire three more items and place them at a table adjacent to the original in the same room. 1. An upgraded vial, which can be obtained in a new area underneath Lab B. First, every player in the game must complete their challenges at the Shrine of Nan Sapwe, to the far right from spawn. Once all challenges are complete, lightning will occasionally strike the shrine, and electrify the ground. A player with the shield should stand in this electricity with it out to electrify their shield. Now, go to the laboratory near Green Water, and electrify a panel near the cage. A player should step inside. In Solo, the cage will lower on its own. In Co-Op, another player must lower the cage. In the area where you are lowered, collect a vial inside a skeleton found there. 2. An upgraded sample of Spider Venom, which can be obtained by defeating the Spider mini-boss. Past the blue water outside Lab A, glowing webs can be found blocking a passageway. These must be shot with the KT-4, opening a slide down to the boss-arena. The Spider will shoot webs and spawn smaller spiders, and at some points its mouth will glow orange, at which point it should be shot there. It will jolt back after enough damage three times, before eventually dying. Once it dies, approach its mouth and collect one of its fangs (Note: there is no prompt for this). Exit the cave up ahead, passing a pool where you can obtain free Widows Wine. 3. From the room where the KT-4 was initially built, use the fast travel pipe to Lab B. Midway through the travel, you will pass a spot with glowing rocks, and should interact at a precise moment to pick up rainbow water. You will know you have picked it up when the bucket icon appears full of water. Now return to the underwater cavern, and with the Skull of Nan Sapwe, mesmerize the wall to the right of where the plant was obtained. A hidden room will be revealed with a spot to plant a seed. Plant a seed, and water it with rainbow water for three consecutive rounds. You can then pick up the plant. (The Rainbow Water can be obtained once this 115 rock is on screen) Now you can craft the upgraded KT-4, the Masamune, which you will need for this quest by placing the three items at the table next to the original.
 -
 NOTE: Before even entering a game of Zetsubou No Shima, one player should have the Anywhere But Here! Gobblegum equipped. Around the map there are four pedestals with a set of symbols on them. You will need to note the symbols on them, and approach the Temple of Nan Sapwe where you can read your challenges, and in the center are four red skulls with symbols under them. Pick up the skull with the symbols for each pedestal, and then place the skull down to begin a short mini-game where you defend the pedestal from zombies, spiders, and sometimes Thrashers. The pedestals are located at the following locations: 1. In the spawn room: 2. Near the airplane trap: 3. At the bottom end of the zipline, near power: 4. In the room where you build the KT-4, near Mule Kick: As you defend the skulls, going down or allowing the zombies to do enough damage will force you to grab the skull and place it down again. Once cleansed, however, pick the skull back up and return it to where you found it. After each skull is cleansed, an electric burst will hit the Temple and a fallen tree will rise into the air, revealing a staircase. Go down the staircase, and interact with the Skull of Nan Sapwe. Corrupted Keepers will begin to spawn and attack you. Simply survive long enough until they disappear, and you can pick the skull up. With the Skull acquired, go into the bunker where the Purple Water is found, and across from it is half a poster on the wall. Pull out the skull, and hold the left trigger to mesmerize this poster and reveal the second half, and the rest of the Easter Egg can begin.
 -
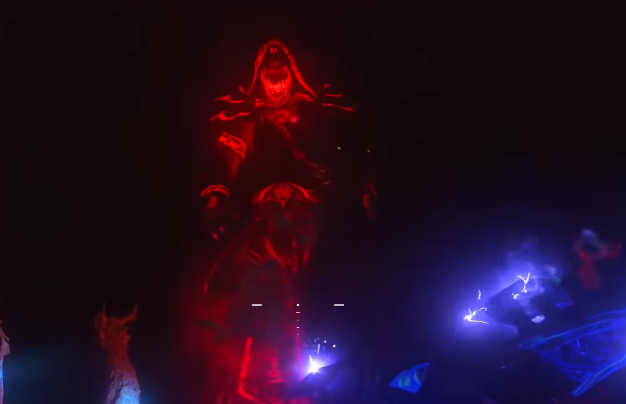 Every player should be prepared for the upcoming bossfight with whatever weapons, gobblegums, and shields they need. Each player should place the Ragnarok DG-4's on one of the blue panels around the pyramid using the left trigger. If you don't already have them, here at the locations. Killing Pandzer Activating the death ray, then using the wundersphere to collect it. Rocket test site, when rocket test goes off, activate switch and go back inside Once rocket test is finished, activate switch on computer and then the part will spawn inside the teleporter. Once you have placed the four Ragnarok DG-4's around the pyramid, you will then be transferred into the boss fight The Keeper will soon spawn along with many skeletons and begin its attacks. Simply survive until the Keeper returns to the middle of the arena, and a ball of white electricity appears below him. Immediately, a player should place down Ragnarok DG-4's below the Keeper to stun him once he descends. Then, the symbol on his chest will glow orange, and every player should damage this symbol as much as possible while avoiding death by the skeletons. If you do not place the Ragnarok DG-4's under the Keeper in time, he will do an attack that instantly downs all players not hidden behind a pillar. So it is crucial you place them down quickly to avoid death. If enough damage is done, the screen will shake and the next stage will begin. Panzers and more skeletons will begin to spawn, as well as a max ammo in the center. Survive and kill to charge your Ragnaroks. Eventually the Keeper will spawn again, and you should repeat the process of placing the Ragnaroks under him during his attack, and shooting his chest symbol. You will repeat this process one more time, as even more Panzers and eventually Hellhounds begin to spawn. With each successive appearance, the symbol on his chest will have more and more health. After the third time successfully damaging his chest, he will be defeated, and you will be returned to the map. Pick up the Summoning Key from the MPD. Then place the Summoning Key at the computers at the top of the castle near the clock tower, and watch as rockets destroy the Moon. The cutscene will then begin, and you have completed My Brother's Keeper.