
RadZakpak
-
Posts
1,328 -
Joined
-
Last visited
-
Days Won
225
Content Type
Profiles
News & Announcements
Zombies Library
Easter Egg Guides
Intel
Forums
Everything posted by RadZakpak
-
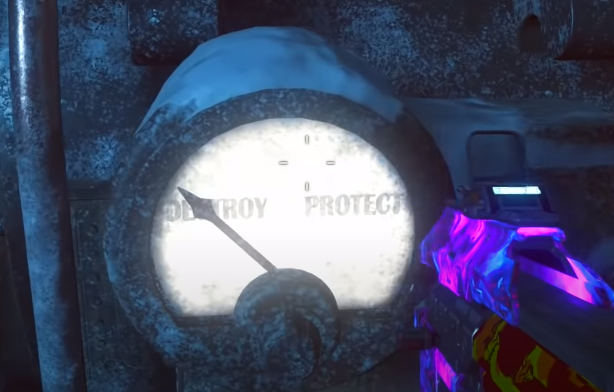 With the items from the safe, return to the Tesla Trap, and below each Tesla Coil, there should be some rods that shoot electricity up to the top, with one missing on each. You can place the rods you acquired from the safe into these spots. Now switch the generator from protect to destroy. Now you must play a game of Simon Says at the computers you interacted with earlier, and at the computers at the rocket test site. The way the game works is, after interacting with the computers, the four symbols will appear for a short time, and you must remember which monitor corresponds to which symbol. They will then disappear, and one of the symbols will appear on the large monitor. Simply interact with the monitor corresponding to that symbol, and then a new one will appear. Repeat until the game ends, and one of the Tesla Coils will have a white glow. Now repeat this with the computers at the rocket test site. Be weary, as if the rocket begins testing during the game and you abandon it, you will have to restart the process on both computers. With both coils charged, approach the Tesla Trap generator, and a button will now be glowing green, and you can interact with it. The rocket holding Dempsey's pod will now be blown up, and it will fly down to the courtyard.
 -
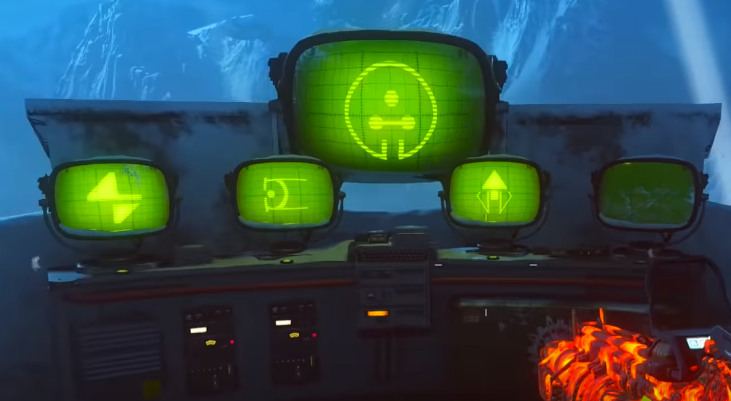 After returning to the map, a Panzer will spawn. Make sure you do not end the round, before you input the code. Head to the tesla trap, you can place the fuses you picked up. Then, go to the right side, and there should be a meter with an arrow pointing to the word destroy. Interact with it so that it is pointing to protect. Now approach a set of green monitors next to the clock tower and Wunderfizz, and four symbols should appear on the monitors. @anonymous @RadZakpak @NaBrZHunterpictures need to be added You must input the three symbol sequence that Groph entered by interacting with the monitors. If done correctly, you can return to the teleporter room, and the safe will now be open, with some items inside to pick up. If you input the wrong code or advance the round so the code is different, you must hunt down the wisps again on the next round and watch Groph input a new code.
 -
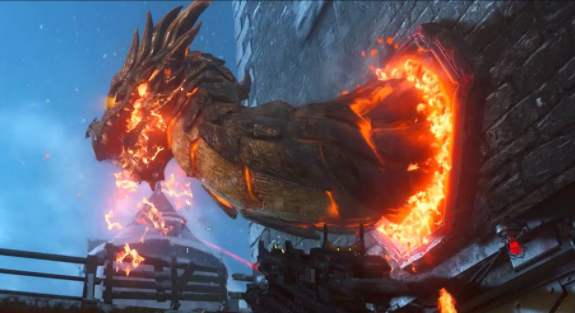
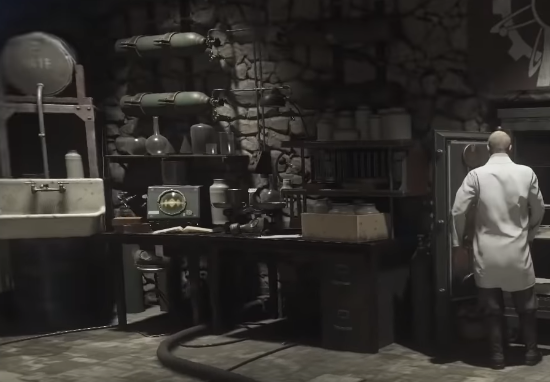 After upgrading a bow, a player will need to use the non-upgraded Wrath of the Ancients to shoot six electric coils above the teleporter. This is possible in one shot in the right position. Once shot correctly, they will glow orange, and after all have been shot, you will hear a roaring noise, and must now search for a set of wisps. An electrical wisp will spawn in one of eight locations, and must be shot with an upgraded bow before time runs out. These are the eight locations: 1. On the table in front of Quick Revive: 2. On the car between spawn and Double Tap: 3. In the room above Double Tap on top of a cabinet: 4. On a globe past Samantha's Room: 5. On a phone in the power room: 6. On a clock in the mission control laboratory, above the dragon head: 7. On some machinery in mission control on the lower floor: 8. On a clock going upstairs from the courtyard: Once one is shot, it will disappear, and the roar sound will be heard when the wisp respawns somewhere else. You will have to shoot the wisp four times without running out of time. If you do run out of time, you will need to wait until the next round. After the fourth wisp, you will hear a different noise, and the teleporter should now have a purple glow on its pad. Every player will now need to enter and teleport back in time. You will only be here for a limited amount of time, so in that time you will need to grab two items, and watch Dr. Groph input a code. The two items to grab are: 1. The fuses, which are on a set of boxes to your right as you leave the teleporter: 2. A blue cylinder, which is to your left as you leave the teleporter: Now approach Groph, who will be placing something inside a safe and he will type a three-symbol passcode. You should watch him put in the code, and be able to recall the code later. The code will be different every game. If you acquired everything you need, you can move on to the next step. If you missed something, you can wait until the next round and shoot the wisps once again.
 -
 After turning on the power, the first step will be acquiring an upgraded bow. You only need one upgraded bow to begin the easter egg, however you will need one of the upgraded bows for each player in the game in a later step, so each player should begin upgrading one. What this means is in Solo, you will only need one bow. With two players, you will need two bows, and so on. Before you can upgrade a bow, you will need to acquire the original Wrath of the Ancients. To do this, you must feed six zombies each to three dragon heads around the map. One is near the mystery box spawn just past double tap. One is inside the main castle area where Speed Cola is located. One is in the undercroft next to the pyramid. After acquiring the Wrath of the Ancients, you craft any of the upgraded bows. There are four bows in total Lightning Bow Wolf Bow Void Bow Fire Bow Here are the steps for each: Lightning Bow Step 1: Shoot the weather vane above the Bastion with the bow. It will drop an arrow to pick up at the base. Step 2: You must light three pyres on fire with the bow. One is located near the bastion behind the clock tower: One is located just past the rocket test site and can be shot from the Bastion: One is visible from the rocket test site looking up the mountain: Step 3: Activate low gravity in the undercroft by standing still on four panels surrounding the pyramid. While in low-gravity, wallrun along the walls of the undercroft, passing over several glowing blue wind-like symbols until a progress bar appears in the top right of the screen and none of the symbols are glowing. Step 4: You will need to kill zombies near some sparking canisters, then electrify the arrow of your bow and shoot the same pyres you shot before. To electrify your arrow, hold back the arrow as if you are about to fire, then approach the canister and the arrow will be sparking. Then you can attempt to hit the pyres. If done successfully, the fires emitting from them will have lightning. One canister is inside the clock tower under the stairs. Use this one to shoot the pyre behind the tower. One canister is across from the buildable table that is near a Wundersphere. Use this one to shoot the pyre in the distance past the test site. One canister is inside the tunnel at the rocket test site, across from the teleporter. Use this to shoot the pyre up the mountain. Step 5: Return to the weather vane and interact where you first picked up the arrow. After it rises to the vane, it will drop as a fixed, glowing arrow. Pick it up. Step 6: Go to the undercroft and interact with the box surrounding the pyramid with a lightning symbol. You will receive a max ammo. Insert your bow into the box, you must kill zombies near the pyramid until the box is charged up. Once no more souls enter the box, you can collect your upgraded bow from the box Wolf Bow Step 1: You must interact with four paintings around the map in the correct order to reveal a wolf symbol of each one. One can be found in the hallway connecting Samantha's Room to the Armory, near a barrier. One can be found in the clock tower. One can be found in the room underneath the clock tower. One can be found in on the walkway in the main room of the castle, near the doorway that leads to a staircase down to the courtyard. The paintings are randomized each game, however they must be interacted with in the same order: The king on his throne with a wolf, a knight riding a horse, a castle engulfed in flames, and then the King struck by arrows. If done correctly, as you enter the undercroft from the laboratory area, the broken arrow will appear from the wall where there is a wolf symbol. Pick up this broken arrow. Step 2: Head to the rocket test site, and shoot a red flag up and to the left of the big door. If hit, it will drop a wolf skull which will come tumbling down and you can pick it up. Step 3: Go to the pyramid in the undercroft, and approach the box with a wolf symbol on it. To the right is a wolf skeleton missing its head. Place the skull on the skeleton, and a ghost wolf will spawn. You must follow him around the map, and he will eventually stop and paw at the ground. You must then kill zombies near that location until the wolf digs and the spot is glowing. Pick up the bone from the hole, and the wolf will start moving again. Keep repeating this process until the wolf ends up in the undercroft and starts pawing at the wall. Step 4: Activate low gravity in the undercroft by standing still on four panels surrounding the pyramid. While in low-gravity, wallrun along the walls of the undercroft, and while still wallrunning, shoot a set of wolf symbols above where the wolf is pawing the wall. A platform should then form underneath for you to stand on. Interact with the tomb on that platform, and a skeleton will form, and hand you the fixed arrow. Step 5: Go to the undercroft and interact with the box surrounding the pyramid with the wolf symbol. You will receive a max ammo, and you must kill zombies near the pyramid until the box is charged up. Once no more souls enter the box, you can insert your bow into the box, and it will come back out as the Wolf Bow. Void Bow Step 1: Go to the area with Double Tap, next to the gumball machine, and look up. You should see some purple symbols on the wall above the gatehouse with the bow. It will then drop a broken arrow for you to pick up. Step 2: In the room below the clock tower, a purple square should appear on the ground. Kill a zombie with a melee kill over this spot and it should break open. Interact with an urn inside the hole, and it will rise into the air. Step 3: You must collect six Keeper skulls around the map that will disappear when interacted with. One is in the tunnel leading to Mule Kick: One is on a windowsill up the stairs from the courtyard: One is in Samantha's Room in a toy chest to the left of her bed: One is to the right of the broken wall leading to Double Tap: One is to the right of the teleporter in a sink: One is at the rocket test site on the back of a truck: Step 4: Got to the room underneath the clock tower and make crawlers, it will be around 6 required Once completed, shoot the urn, you need to remember the words. Step 5: Head to the undercroft and kill zombies, some of them will drop purple symbols. When you pick up the symbols they drop, that symbol will glow on the ground around the urn. It is okay if you collect symbols you do not need, but once the three symbols you noted earlier are lit up, you can shoot all three with your bow to finish the step. Interact with a flame that comes from the hole, and after a moment you will get a fixed arrow. Step 6: Find the three knights matching the words spoken in step 4 Step 8: Remember the symbols shown to you when you found the correct knights and head back to the room underneath the clock tower and shoot the corresponding symbols. They will then appear in the air and the voice will confirm, that is his name. Now collect the arrow Step 7: Go to the undercroft and interact with the box surrounding the pyramid with a purple symbol. You will receive a max ammo, and you must kill zombies near the pyramid until the box is charged up. Once no more souls enter the box, you can insert your bow into the box, and it will come back out as the Void Bow. Fire Bow Step 1: Inside the clock tower and up the stairs, shoot out the wall with a red symbol using the bow to get a broken arrow. Step 2: Go to the rocket test site, and wait for the rocket to begin testing. Wait near the door with your arrow pulled back, and as soon as it opens, you must shoot a rock up and to the right which has a glowing red spot. If done quickly enough, a fireball will shoot up to the castle. Step 3: You must shoot three red glowing rings while in mid-air using the Wundersphere. This is one of the hardest bows to get for this step alone. If shot correctly, the rings will have fire around them. One is found between spawn and double tap, and can be shot on the Wundersphere from the rocket test site to spawn. One is found on the bastion in front of one of the Wunderspheres, and can be shot using the Wundersphere from the courtyard. One is found next to the landing pad at the clock tower, and can be shot from the Wundersphere near the buildable table. Step 4: While standing on each ring, kill zombies to collect their souls until no more can be collected. Step 5: Head to the top of the clock tower and interact with the cogs where you collected your arrow. A symbol should appear you will have to light a fireplace corresponding to that symbol. There are three fireplaces Church Room upstairs at first dragon Near samanthas room You need to light the fire place. At the circle closest to the fireplace a little volcano appears and this is how you know you are in the right circle. Stand inside the circle and shoot strategically to position for your second shot. Your last shot needs to go into the fireplace. From the starting point, you must fire your arrow into the air, and wherever it lands, some glowing red rocks will appear. Standing in those rocks, you can fire again for another set of rocks. Eventually, you will want to end up in front of the fireplace so you can shoot directly into it. You must do this in three shots or less, however, so it is key your arrow lands in a good place each time. If the ring near Double Tap is glowing, you will need to light the fireplace near Samantha's Room. The easiest way to do this is to stand on the ring, shoot the snow underneath the bridge, then shoot up towards the entrance to samantha's room, and then shoot into the fireplace. If the ring by the Death Ray and Wundersphere is glowing, you must shoot your arrow into the fireplace near the laboratory under the dragon head. The easiest way to do this is to aim and shoot to where your arrow lands in the courtyard near the entrance to the castle, then shoot into the laboratory, somewhere where you can see the fireplace, and then shoot the fireplace. If the ring is by the clock tower is glowing, you will need to light the fireplace on the other side of the castle, in the room where the Wunderfizz machine is. The easiest way to do this is to aim high and try to land in the area under the bridge, then aim up to the walkway that is able to see the fireplace, and then shoot the fireplace. Once done, you can interact with the fireplace to acquire your fixed arrow. Step 6: You now need to interact with the fireball in the courtyard at where the weather vane is You'll now receive your arrow Step 7: Go to the undercroft and interact with the box surrounding the pyramid with a red symbol. You will receive a max ammo, and you must kill zombies near the pyramid until the box is charged up. Once no more souls enter the box, you can insert your bow into the box, and it will come back out as the Fire Bow.
 -
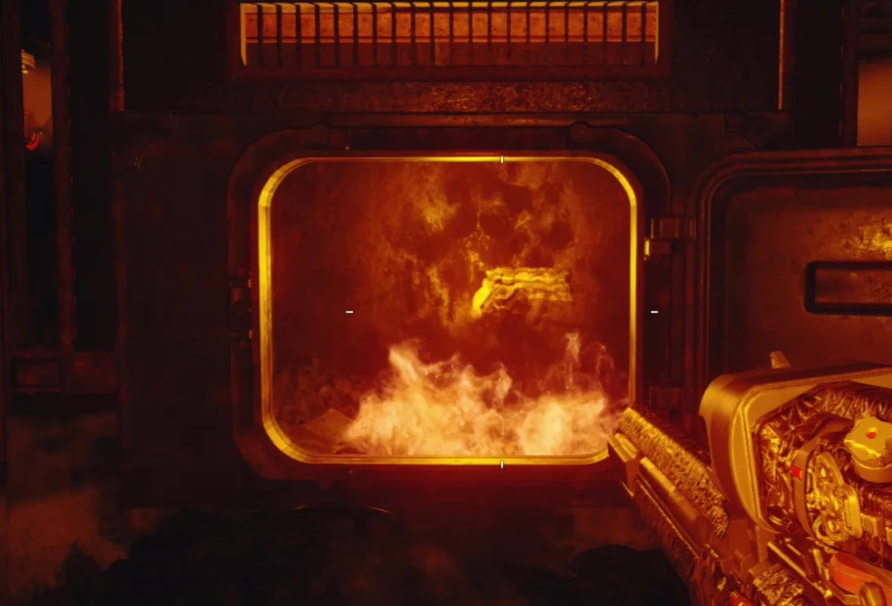 Now you will have to locate three items around the map and shoot them with any weapon. Every time you shoot one Maxis will confirm this by saying something. The locations of the items are: Inside a compartment under Teleporter A. On a balcony just outside above the power. Inside a vat in front of Teleporter B. After all three have been shot, you can go to the furnace in the garage, and grab the Annihilator Specialist Weapon. You will get progress towards A Better Tomorrow.
 -
 To do this step, the player must obtain a Pack-a-Punched weapon. Now, you have to go the alleyway in the direction of the animal labs, the area to the right of the Pack-a-Punch machine but before entering the building. Look outside the barrier: Far in the distance you will notice a control panel on a pillar. Shoot it with your upgraded weapon or throw a grenade at it. If done correctly, Maxis will speak to you Several items around the pillar will be emit a green glow and start to fly up in the sky and disappear.
 -
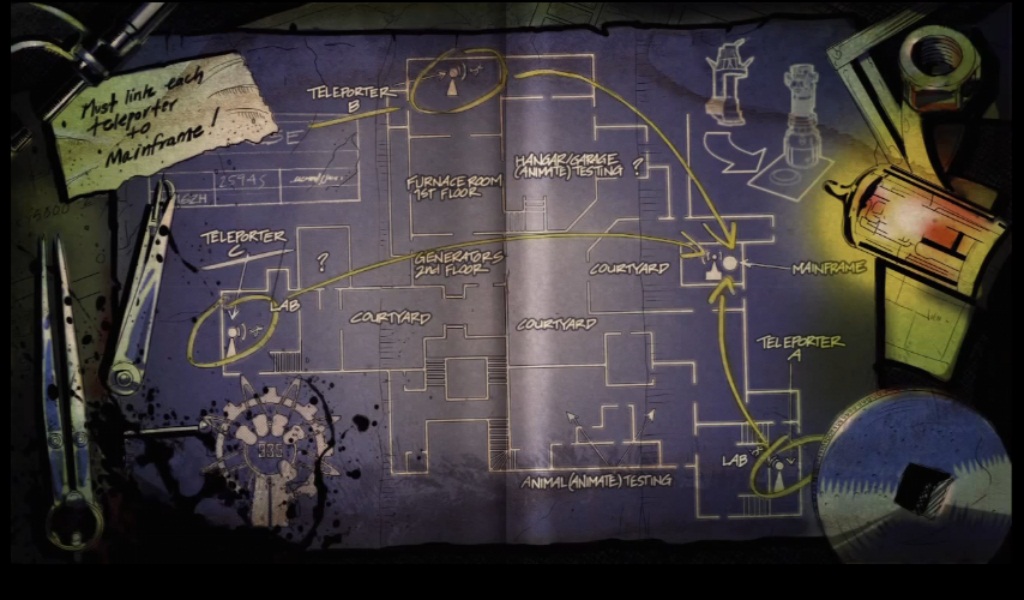 Activating the Pack-a-Punch machine is a relatively easy step. First, one has to open enough doors to gain access to all three Matter Transference Devices (M.T.D.'s), also known as Teleporters. The following map perfectly indicates the three locations: Now, you have to link them to the mainframe in the spawn room. To do this, step inside an MTD and press your activation button, which will be followed by a mechanical noise and the appearance of a clock on your screen counting down from 30 seconds. Within this time period, someone must go to the mainframe and activate the receiving pad in front of the Pack-a-Punch machine. Do this with each MTD until the door is fully open. This will permanently allow the players access to the Pack-a-Punch machine.
 -
 For the final step, three players must be located at or near a train station, and the last should be in the center of the map where three Keepers are surrounding a Giant Gateworm. Someone at one of the train stations must go into human form and have a goblet ready to transform back into Beast Mode. They must call the train to their location, and immediately return to Beast Mode. The players near the three train stations must shock a box on the top corners of the stations where you would enter the train. They must keep shocking the box so that the rails stay glowing blue. Quickly, before the train passes through the middle of the map, the central player must zap all three Keepers. If done correctly, as the train passes by the Gateworm will be killed and the final cutscene can begin. You will receive progress towards A Better Tomorrow and a Calling Card.
 -
 The entire map will be filled with purple glyphs and Margwas. If you touch the purple glyphs you will become damaged. Additionally, your screen will turn red every thirty seconds. When this happens, you must run to one of the white orbs floating around the map to prevent yourself from going down. You may notice the stone goblets around the map will have red flames instead of blue flames, preventing you from becoming the beast. To recharge a stone basin you must kill at least one Margwa. All four players will need to be in Beast Mode, three of them in Canals, Footlight, and Waterfront, with the final player being in the center of the map near the crane. Beast mode will last for an infinite amount of time. However, if you revert to human form, let the Margwas hit you too many times, or allow the screen to turn red for long enough without touching a green orb, you will need to kill another Margwa to recharge another stone basin. So always be ready to grab a white orb as you perform the next step.
 -
 All four players should go into the Pack-a-Punch room, and four Keepers should be near the Gateworm pedestals. Interact with each of them, and then the boss fight will begin. The Shadowman will appear, and when he has a circular aura around him he cannot be damaged. But when it disappears, all players should begin shooting him with their automatic weapons, and continue to do so as he teleports around the room. With enough damage in a short amount of time, he will teleport closer and closer to the ritual altar. Once he is above it, a player will need to interact with the altar to pull the Shadowman into the Summoning Key, defeating him. If you fail to damage him enough in a short amount of time, interact with each Keeper to get rid of his aura and try again.
 -
Treyarch has revealed the name of the next Operation coming July 9th, 2019 on PS4: Operation Apocalypse Z Operation Apocalypse Z will be a Zombies-themed operation with new content coming to Zombies, Blackout, and Multiplayer. This includes the release of the new Zombies experience Alpha Omega, the second-to-last installment in the Aether Storyline. Let's break down what we know so far about what is coming to each respective mode. Zombies - This Operation will see the release of Alpha Omega, a new spin on the classic Nuketown map and the penultimate map in the Aether Storyline. Yesterday Treyarch released a mosaic poster for Alpha Omega; Pictured on the poster are Primis, Ultimis, as well as a zombie face in the center of a mushroom cloud. It is unknown which of the two groups will be playable, or if even both will be. Treyarch also released the Aether Returns video for Alpha Omega, which may potentially be the intro cutscene. It depicts many key moments in the Aether Storyline with a narration by Nikolai hinting at what is to come. Treyarch also tweeted blueprints for a new weapon meant to be appearing in Alpha Omega. It seems to be a new version of the Ray Gun Mk II, originally from Black Ops 2, with four different elemental modes to be used. - Due to leaks by Joshwoocool on Twitter, we also know a new perk is coming to Zombies called Bloodwolf Bite. It is unknown what effects it will have. - On Monday at 11AM PT, Treyarch will be hosting a livestream to reveal some of the new content coming in this Operation, including a gameplay reveal of Alpha Omega, and there is mention of a very special guest coming. This guest (or guests) may be members of Avenged Sevenfold, and we may be seeing a new song released with the map, or in a future map. Blackout - The Blackout map will be receiving an update, most likely with the addition of a classic zombies map drop location. - Alcatraz will return, as well as a "dark new twist" coming to Alcatraz during the Operation - Splitscreen co-op will return as well on July 9th. This feature was removed recently for unknown reasons. - We can also gather from the initial teaser gif from Treyarch's Twitter that Russman will be arriving as a playable character sometime in the operation. From voice lines in the files for Misty, we can gather the rest of Victis should be arriving at some point as well. We also see two characters riding a motorcycle with a sidecar which will most likely appear in the Blackout map update. Multiplayer - The new Operation will see the release of new maps with the Black Ops Pass, and there will be walkthroughs coming on the Monday livestream. it is speculated that there will be two, and both will be themed after Zombies. This is based on two tweets from Treyarch with mysterious gifs from two unknown locations that contain Zombies assets. Treyarch has similarly hinted at Multiplayer maps in this manner in the past. The first gif has coordinates which point to Austria, meaning this map may be themed similarly to Der Eisendrache, though they are not exactly at its real-world location. The second shows both assets from the Aether and Chaos storylines, and with the description "Exit through the gift shop", we can gather the map may be some sort of Zombies-themed museum. - The livestream will also feature gameplay for a brand new mode. Data-mined Leaks have also been revealed *Spoilers*
-
A new Storybook chapter is up! "Expansion"
-

Not only is it a great joy to read you chapters, writing it down this detailed and chronological way also makes me actually look to the Storyline as logical, and understandable, instead of total Chaos. Love all your references to real life history, as usual, and the in-game references too. General Amsel, PaP'ed weapons and a D9-shared Verrückt? Wunderbar!
-
-
Book 2 Prologue and Chapter 1 now posted! https://www.callofdutyzombies.com/topic/183877-the-cod-zombies-storybook/?do=findComment&comment=1768683
-
Does anyone remember Nightmares? And how Deimos was the main antagonist, and we were so confused by the lack of connection to the zombies story. Could it have some connections with the Chaos storyline?
-
-
All five chapters of Attack on the Pentagon are now posted on the storybook section of the site. Here is chapter 1: http://www.callofdutyzombies.com/story/fivech1
-
Chapter 3: "Shlaukopf" of Book 1 is now on the site! Hope you enjoy!
-
Chapter 16: "Space Race" of the CoDz Storybook is now up on the site here.